Automate Website Screenshots with Make
Build a Make scenario that captures webpages on a schedule or webhook, then routes screenshots to storage, email, OCR, or another app.
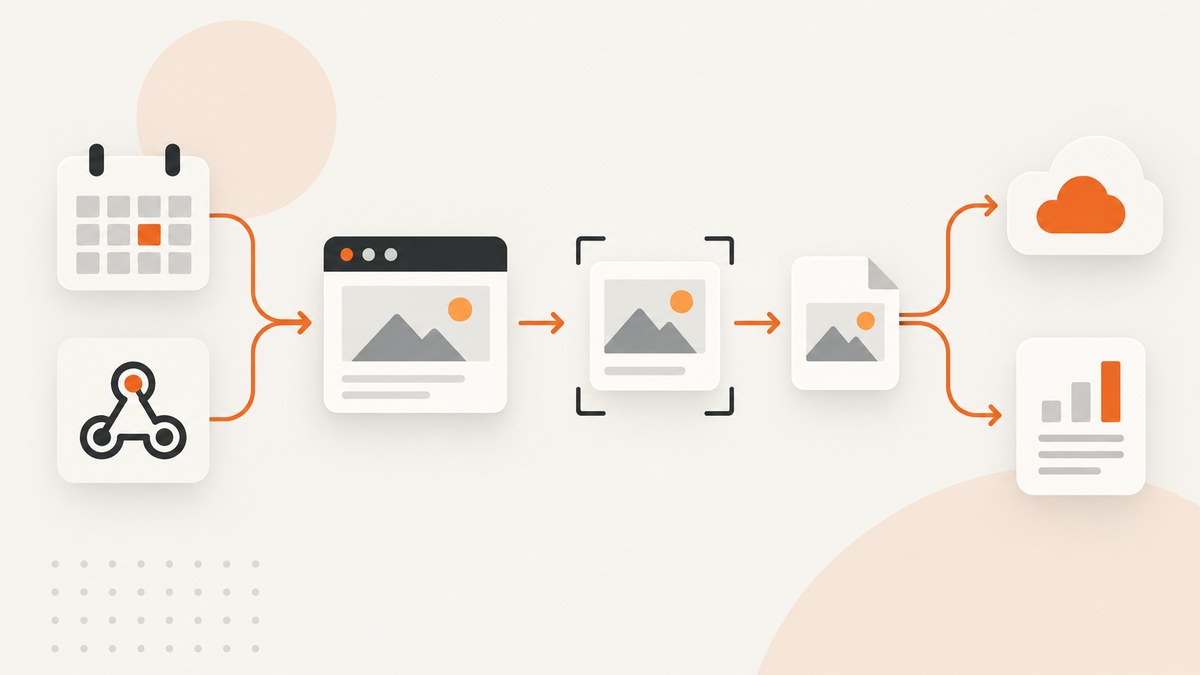
To automate website screenshots with Make, create a scenario with three parts: a trigger that supplies a page URL, a capture step, and a destination for the returned image. Use a native screenshot integration when its options fit your workflow, or Make’s HTTP app to call a screenshot API that does not have a native Make integration. Then map the resulting file to cloud storage, email, OCR, or another downstream app.
This pattern works for scheduled snapshots, webhook-driven captures, and API-triggered workflows. The details that matter most are whether you need a whole page or a single element, how the provider authenticates, whether its module returns a file you can map, and how your scenario should handle errors.
1. Choose the trigger and define the input
Start with the event that should cause a capture. A scheduled scenario is suitable for recurring monitoring or reports. A webhook can start a run when another service has a page ready. A database or other Make event can supply the URL when a record is created or updated. You can also expose an active scenario through Make’s API with required inputs and scenario outputs.
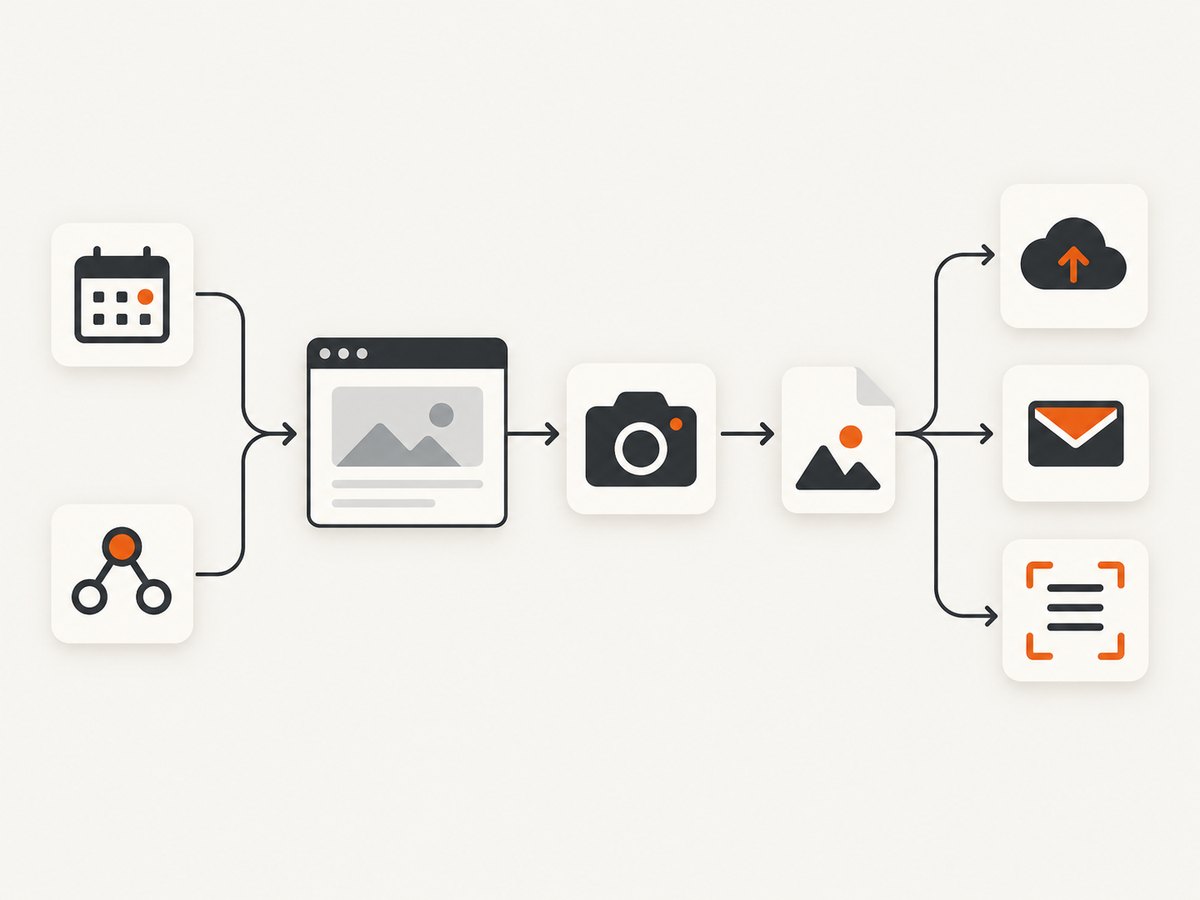
At minimum, pass a URL into the scenario. Consider including a record ID, destination folder, capture type, and timestamp when downstream processing needs them. Keep the source URL with the stored image so a later run can be compared with the right page.
- Create a scenario and add your chosen trigger.
- Make the page URL available as a mapped value. For a webhook, define a structured input; for a recurring job, store the URLs in a source module or data store.
- If you plan to expose the scenario to another system, define the scenario’s required inputs and outputs before building the capture step.
2. Pick a screenshot capture route
There are three practical routes in Make. The right one depends on the capture options and output handling you need.
| Route | Use it when | Check before building |
|---|---|---|
| GetScreenshot integration | You want its native webpage screenshot or element screenshot action. | Element captures require a CSS selector. Confirm the action’s output is suitable for your next module. |
| HTML to Image API integration | You need URL screenshots, HTML/CSS rendering, image formats, or PDF generation. | Choose the action that matches URL versus HTML/CSS input and the desired image or PDF output. |
| HTTP app | Your screenshot provider has no native Make integration, or you need to call a compatible endpoint directly. | Set up authentication in the credentials field, use HTTPS, and confirm how the endpoint returns the file. |
Make’s HTTP app connects to API services that do not have a Make integration. It includes modules for making a request and downloading a file over HTTPS. The native GetScreenshot listing includes “Take Screenshot” and “Take Element Screenshot”; the latter requires an element selector. HTML to Image actions include capturing a website screenshot, creating a screenshot of a URL, converting HTML/CSS to PNG, JPG, or WebP, and generating PDFs from a URL or HTML/CSS.
Whole webpage or one element?
Use a webpage capture for a landing page, dashboard, article, or full-page record. Use an element capture when only one card, chart, table, or other selected region belongs in the output. Element capture depends on a selector that matches an element in the rendered page. If the selector is wrong or the element appears only after interaction, the result may be empty or incomplete; verify the selector and account for the page’s loading behavior with provider options where available.
URL capture or HTML/CSS rendering?
A URL capture asks the provider to render a live page. HTML/CSS rendering is useful when the scenario already has markup and styles to render rather than a public page URL. Choose the provider action based on the source you actually have: URL, HTML/CSS, or an element on a webpage. If a downstream app expects a particular file type, request or convert to that format before mapping the result.
3. Build the scenario and route the image
- Add the capture module. Select the native action or configure an HTTP request. Map the URL from the trigger. For element capture, also map or enter the CSS selector.
- Configure credentials. Use Make’s dedicated connection or credentials fields. The HTTP app supports Basic Auth, API key, or OAuth 2.0; its documentation advises entering authentication details in the dedicated Credentials field instead of passing them through headers or query parameters.
- Run a representative scenario. Inspect the module output and identify the returned image or file field. A response may be a downloadable file or data that must be handled according to the provider’s module.
- Add the destination. Map the file to cloud storage, an email attachment, OCR, or a report module. The HTML/CSS to Image and HTTP documentation describes an OCR workflow using Google Cloud Vision.
- Save useful metadata. Store the source URL and capture timestamp alongside the file. Include the originating record ID or job ID if you need to match the image back to its trigger.
- Set error behavior. In the HTTP module’s advanced settings, enable returning an error for 4xx or 5xx responses when those failures should stop the scenario. Add error handling that records the URL and failure context or routes the run for review.
Example: scheduled page snapshots
Create a scheduled trigger, read a list of URLs, and process each URL through the screenshot module. Send the output file to a folder organized by site or date, and store the URL and timestamp as metadata. If a URL fails, preserve enough context to retry that page without losing successful files from other URLs.
Example: webhook to screenshot to OCR
Receive a URL and reference ID with a webhook, capture the page, pass the image to an OCR module, and store the extracted result with the reference ID. If the scenario exposes outputs to a caller, return a status and the destination reference after downstream handling completes. Avoid returning a success response before the scenario has reached the point your caller considers complete.
4. Call a screenshot API with Make HTTP
When a provider does not have a native module, use Make’s HTTP app. Add its Make a request or Download a file module, enter the provider’s HTTPS endpoint and authentication in the appropriate fields, and map the page URL as a parameter. Use Download a file when the provider’s endpoint returns image bytes that should flow into a file destination. Follow the provider’s API documentation for method, parameter names, response format, and authentication.
For a concrete API call, ScreenshotNeo accepts a URL in one GET request and returns an image or PDF. The examples below save the response as WebP; adapt the target URL as needed. See the ScreenshotNeo API documentation for request options.
cURL
curl -G "https://api.screenshotneo.com/v1/shot" \
  -d access_key=YOUR_API_KEY \
  --data-urlencode url=https://stripe.com \
  -o shot.webp
Python
import requests

r = requests.get(
    "https://api.screenshotneo.com/v1/shot",
    params={"access_key": "YOUR_API_KEY", "url": "https://stripe.com"},
    timeout=90,
)
r.raise_for_status()
open("shot.webp", "wb").write(r.content)
Node.js
const q = new URLSearchParams({
  access_key: 'YOUR_API_KEY',
  url: 'https://stripe.com'
});
const res = await fetch(`https://api.screenshotneo.com/v1/shot?${q}`);
if (!res.ok) throw new Error(`Screenshot request failed: ${res.status}`);
await import('node:fs/promises').then(fs => fs.writeFile('shot.webp', Buffer.from(await res.arrayBuffer())));
In Make, keep the key in a credential or connection field where supported, rather than exposing it in a scenario input or a logged URL. Configure the module to treat HTTP errors as errors when a failed capture should stop the route. Before relying on the scenario, check that Make presents the response as a file that your chosen destination can accept.
5. Configure capture behavior for the page
Capture options vary by integration and provider. Check the selected module’s available fields rather than assuming every service supports the same controls. The options below are useful decision points for automated workflows:
- Output: PNG, JPEG, WebP, or PDF. Match the format to the destination or later processing step.
- Page versus element: Use a full webpage capture for broad context, or a CSS selector for a specific component.
- Rendering input: Choose a live URL or HTML/CSS input as applicable.
- Page readiness: If available, wait for a selector, a delay, or network idle when content renders asynchronously.
- Viewport and device: Set the dimensions or device preset if the layout changes across screen sizes.
- Interaction and cleanup: Where supported, click an element, hide selectors, or apply custom CSS or JavaScript before capture.
- Access: For protected pages, check provider support for headers, cookies, or authorization and ensure the scenario has the required access.
For repeatable comparisons, use consistent capture settings and preserve them with the run metadata. A different viewport, timing rule, or format can change the result even when the page itself has not changed.
6. Reliability, performance, and cost
Reliability
Use HTTPS endpoints and keep credentials in Make’s dedicated credential fields. Decide whether a 4xx or 5xx response should stop the scenario, be retried, or be routed to an error handler. Preserve the input URL and failure details so a human can identify whether the problem came from the target page, authentication, a selector, or the capture provider.
Do not assume every site can be rendered successfully. Authenticated pages, anti-bot checks, slow resources, and client-side rendering can affect the result, and Make’s integration pages do not guarantee capture on every site. Validate representative targets and selectors with the provider you choose. For batch work, isolate failures so one problematic URL does not prevent useful outputs for other pages.
Performance
Scenario runtime depends on the number of pages, page load behavior, capture settings, and downstream actions. A page that waits on slow resources can hold up later modules. Use a readiness condition appropriate to the page instead of adding arbitrary delay if the provider offers selector or network-idle waits. Send only the necessary image format and page region to downstream processing. For recurring workflows, avoid capturing unchanged pages more often than the result needs.
Cost
The dossier’s Make documentation establishes available modules and controls but does not provide comparative pricing or latency benchmarks for screenshot providers. Check the current Make plan and provider pricing for your expected run volume, retries, and output types. Estimate workflow volume as scheduled runs multiplied by pages per run, then account for webhook or manual reruns and any separate OCR or storage charges. Do not treat a successful scenario execution as proof that every provider bills in the same way.
7. Troubleshooting
| Symptom | Likely cause | What to do |
|---|---|---|
| HTTP 401 or 403 | Missing, incorrect, or insufficient credentials; access may also be restricted by the target site. | Check the provider credential setup and permissions. Confirm the target page is accessible with the supplied authentication method. |
| HTTP 404 | Incorrect endpoint or target URL. | Check the API endpoint and URL mapping. Confirm the URL includes the expected scheme, such as https://. |
| HTTP 4xx or 5xx stops the scenario | The HTTP module is configured to return an error for the response, or the provider rejected the request. | Inspect the response details and request parameters. Keep the error behavior if the destination must never receive a failed capture; otherwise route the error to a handler. |
| Image field is missing at the destination | The capture module returned a URL, metadata, or another response shape rather than a file object. | Inspect a successful module output. Use a download step if the response provides a file URL, or configure the HTTP download module for binary output as documented by the provider. |
| Element screenshot is blank | The selector does not match, the element is not rendered yet, or the selected region is hidden. | Verify the CSS selector in the page, wait for it to appear if supported, and check whether it is visible at the chosen viewport. |
| Page is captured before content appears | Client-side content has not finished rendering when the capture starts. | Use a selector wait, network-idle option, or an appropriate delay if exposed by the capture action. |
| Output is a PDF or image with the wrong type | The wrong action or output format was selected. | Choose the matching URL or HTML/CSS action and specify the file format expected by the destination. |
| Target page fails while the API call succeeds | The target may require login, block automation, or fail during its own load. | Check the page directly and review provider support for cookies, headers, and access controls. Validate the case with that provider. |
8. Or skip the browser setup
ScreenshotNeo provides a website screenshot API and MCP server. One GET request with a URL returns a screenshot or PDF. Its API can remove cookie and consent banners, newsletter popups, and chat widgets before capture. Bot checks and CAPTCHAs, blank pages, timeouts, failed loads, and cache hits are not billed; response headers report the page verdict and billing status. An MCP server gives AI agents tools to take screenshots, get page information, and capture PDFs.

For Make, call the endpoint with the HTTP app and map the returned file into your next module. The API also works directly from scripts:
curl -G "https://api.screenshotneo.com/v1/shot" -d access_key=YOUR_API_KEY --data-urlencode url=https://stripe.com -o shot.webpimport requests
r = requests.get("https://api.screenshotneo.com/v1/shot", params={"access_key": "YOUR_API_KEY", "url": "https://stripe.com"}, timeout=90)
open("shot.webp", "wb").write(r.content)const q = new URLSearchParams({ access_key: 'YOUR_API_KEY', url: 'https://stripe.com' });
const res = await fetch(`https://api.screenshotneo.com/v1/shot?${q}`);Cookie banners, popups, and chat widgets are removed before the shot. Bot checks, blank pages, and failed loads are never billed. The MCP server lets AI agents take screenshots. The Free plan includes 1,000 screenshots a month with no card; paid plans start at $5 for 3,000 screenshots. Every feature is on every plan. See the API docs and sign up for 1,000 free screenshots a month, with no card.
FAQ
Can a Make scenario return a screenshot to the service that triggered it?
Make documents scenario inputs and outputs for active scenarios, including API execution. Define the output you need and return it at the appropriate point in the workflow; make sure the caller can access any returned file or destination reference.
Can I capture a chart or one section of a page?
Yes, when the selected integration offers element capture. The GetScreenshot integration lists an element screenshot action that requires a selector. Confirm that the chart is present and visible when the capture runs.
Can the screenshot workflow also do OCR?
Yes. Route the captured file into an OCR service. Make’s HTML/CSS to Image and HTTP documentation describes a Google Cloud Vision OCR workflow for captured content.
Does Make publish a universal screenshot provider benchmark?
The cited Make pages document modules and controls, not comparative provider prices or latency benchmarks. Compare the options against your required capture behavior, authentication, file output, and destination workflow.


