How to Create PNG Images with Transparent Backgrounds
Remove an image background, preserve soft edges, and export a PNG with working transparency in GIMP or Photoshop. Includes checks for white or black backgrounds.

To create a PNG with a transparent background, remove or mask the background in an image editor, make sure the layer has an alpha channel, then export as PNG. Check the exported file by opening it in an editor and placing a contrasting color behind it. If the background appears white or black, it may not actually be transparent.
PNG transparency is stored in an alpha channel. Use a full-alpha PNG mode when you need soft, partially transparent pixels around antialiased edges; JPEG cannot preserve transparency. The checkerboard you see in an editor is only a preview of transparent pixels, not part of the image. [GIMP documentation: alpha transparency] [GIMP PNG export documentation]
What you need before you start
You need an image editor that can remove pixels or create a layer mask, plus an image with a subject you can separate from its background. A plain, evenly colored background is generally easier to select than a detailed scene. Hair, fur, smoke, transparent glass, shadows, and motion blur usually need more careful mask work.

- For a simple logo or product: a color selection or fuzzy selection may be enough.
- For complex outlines: use a mask or path, then refine the edge at high zoom.
- For a subject against a busy scene: automatic selection can save time, but inspect and correct the result.
- For soft edges: retain full alpha transparency rather than a PNG8 export mode.
Keep an editable source file with its layer or mask intact. That makes later edge corrections much easier than trying to repair an already flattened PNG.
Method 1: Make a transparent PNG in GIMP
- Open the image and select its layer. In the Layers panel, choose the layer that contains the background and subject.
- Add an alpha channel if needed. Use Layer > Transparency > Add Alpha Channel. This allows deleted or masked pixels to become transparent. GIMP’s documentation says an alpha channel is required to export an image with alpha transparency. [GIMP: Add Alpha Channel]
- Select the background. For a flat background, try the Fuzzy Select or Select by Color tool. Adjust the threshold so the selection follows the background without cutting into the subject. For a complicated boundary, use a path or create a layer mask instead of relying on one broad selection.
- Inspect the selection before removing anything. Zoom in around the outline. Add missed background areas to the selection and subtract subject areas that were accidentally included. A small feather can soften a jagged selection, but too much feathering makes the subject look blurry.
- Remove or mask the selected background. Delete the selection to reveal the transparency checker pattern, or add a layer mask and paint on the mask. A mask is safer: paint black to hide unwanted pixels and white to restore them, using a soft brush where the edge needs gradual blending.
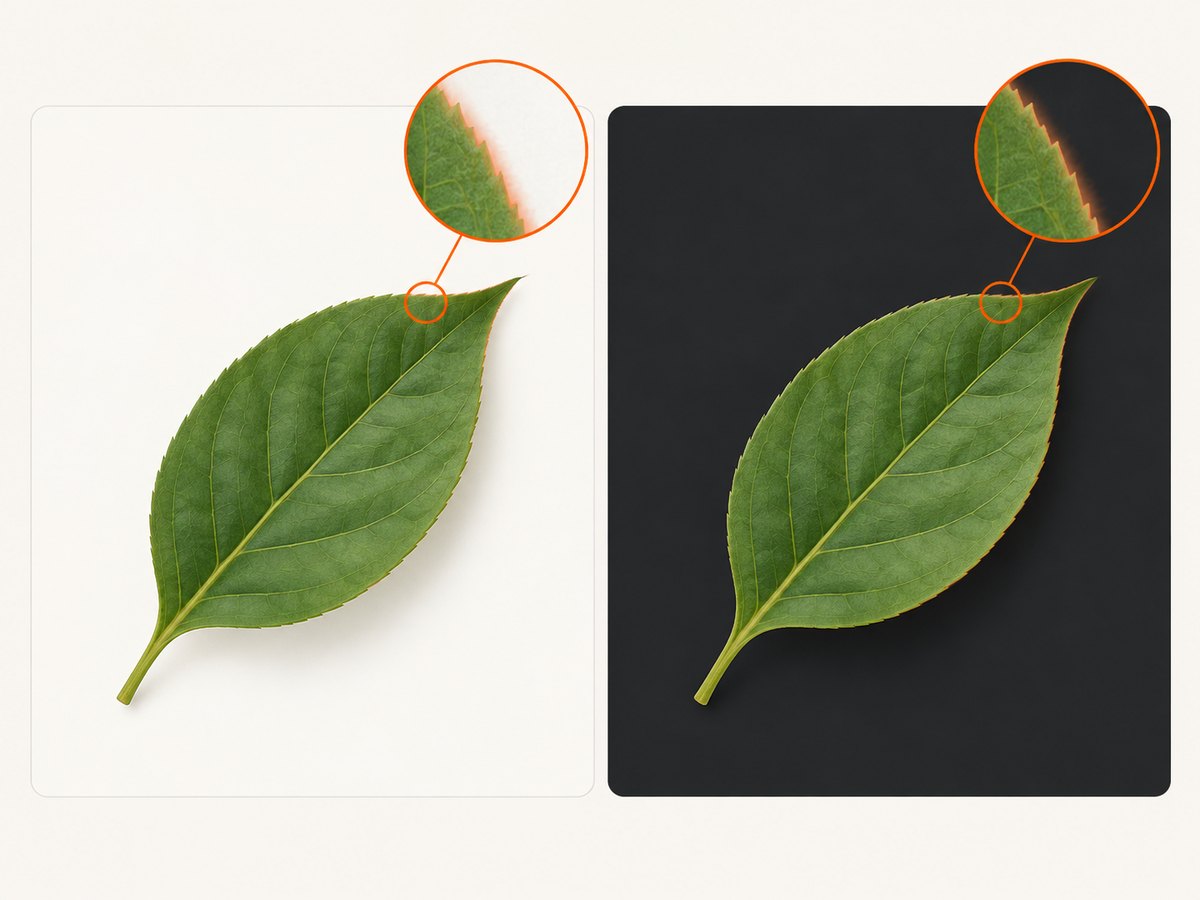
- Check the result against more than one color. A pale fringe can disappear on white and become obvious on dark backgrounds; a dark fringe can do the reverse. Temporarily place solid-color layers behind the subject and inspect its edge.
- Export as PNG. Choose File > Export As, use a filename ending in
.png, and select Export. Choose an RGB/RGBA or grayscale-with-alpha format if the export options offer pixel-format choices and you need partial transparency. Avoid PNG8 for soft edges: it reduces transparency to transparent or opaque states.
GIMP’s checker pattern means those pixels are transparent in the editor. Do not fill the checkerboard or screenshot it as a substitute for transparency; that would make the pattern visible in the final image.
Choosing between delete and a layer mask
Deleting the selection is quick for a simple, clean cutout. A mask is preferable when the selection may need adjustment: you can repaint the mask without recovering deleted pixels. For fine hair or shadows, use a smaller brush at high zoom and alternate between hiding and restoring edge pixels. Check the cutout at its intended display size as well; a technically clean edge can still look too sharp or too soft when scaled down.
Method 2: Make a transparent PNG in Photoshop
- Select and unlock the image layer. In the Layers panel, unlock the background layer if necessary so it can support transparency.
- Run Remove Background. Open the Discover panel from the search icon or choose Help > Photoshop Help. Select Browse > Quick Actions > Remove Background. Adobe says this action isolates the subject and creates a transparent background or a masked layer ready for compositing or export. [Adobe Photoshop Quick Actions]
- Refine the mask. Put a temporary high-contrast layer beneath the subject and inspect the outline. If the selection is imperfect, paint on the layer mask with the Brush tool to hide or restore edge areas. Adobe recommends high-contrast source images and manual brush refinement when background removal is imperfect. [Adobe: Remove background]
- Export with transparency. Use Photoshop’s PNG export option. If the Export As dialog shows a Transparency setting, make sure it is enabled. Keep the layered document if you may need to edit the mask later.
Automatic isolation is a starting point, not an edge-quality guarantee. Inspect small details such as hair, gaps between limbs, product handles, and translucent objects. For logos with geometric edges, a manual selection or path can sometimes give more predictable control.
PNG alpha transparency, PNG8, and JPEG
The alpha value controls how visible each pixel is: fully transparent pixels reveal what is behind the image, opaque pixels cover it, and partial alpha blends the pixel with the background. That partial transparency is useful for antialiased edges, soft shadows, and translucent effects.
| Format or mode | Transparency behavior | Use it when |
|---|---|---|
| PNG with full alpha | Can preserve partial transparency along with fully transparent and opaque pixels. | You need smooth cutout edges, shadows, or translucent details. |
| PNG8 | Transparency is one-bit: pixels are transparent or opaque. | A limited palette and hard-edged transparency are acceptable. |
| JPEG | Does not support transparent pixels. | The final image will have a solid background. |
PNG’s alpha channel records transparency separately from the image’s color values. If your editor offers a color type or pixel format, choose one with alpha for an image that needs transparency. [GIMP PNG export documentation] GIMP’s tutorial also states that JPEG does not support transparent images. [GIMP quick tutorial]
How to verify the exported PNG
- Reopen the exported PNG in GIMP, Photoshop, or another editor that displays transparency.
- Place a solid layer behind it, first a light color and then a dark color.
- Look for a visible rectangle, a checker pattern baked into the pixels, or a fringe around the subject.
- Inspect both the full image and the boundary at high zoom. If the alpha edge looks correct in the editor but not in a target app, check that app’s background and image-rendering behavior.
- Keep the original layered file if you expect to revise the selection.
A file extension alone does not prove that an image has transparency. A PNG can have an opaque background. The contrasting-background check verifies that the background pixels are actually transparent.
Common problems and fixes
| Symptom | Likely cause | Fix |
|---|---|---|
| The exported image has a white or black rectangle. | The background was never removed, the layer lacked an alpha channel, or an alpha-free export mode was selected. | Return to the source document, add an alpha channel, remove or mask the background, and export as PNG with alpha. Reopen and test against a contrasting color. |
| The checkerboard appears in the final image. | The editor preview was captured or painted into the image instead of exporting transparency. | Undo the checkerboard pixels and export the actual image layer as PNG with alpha. |
| The PNG becomes solid when saved as JPEG. | JPEG has no transparent-pixel support. | Export from the editable source as PNG. If a JPEG is required, put a deliberate solid background behind the subject first. |
| The outline has a white or dark halo. | Edge pixels may contain colors from the old background, or the mask edge may be too soft or too hard. | Inspect against contrasting backgrounds; refine the mask with a small brush, and adjust the selection edge. Recheck at the final display size. |
| Hair, smoke, or shadows look cut out. | A binary selection removed partial-opacity detail. | Use a mask and preserve full alpha. Refine gradually with a soft brush and inspect at high zoom. |
| Parts of the subject disappeared. | The selection included similar-colored subject pixels, or the automatic isolation missed low-contrast areas. | Paint white on the mask to restore the subject; inspect gaps and thin details against both light and dark backgrounds. |
| The image looks jagged at small sizes. | The selection edge is pixelated, or a hard one-bit transparency mode was used. | Refine the mask and export with full alpha so antialiased edge pixels can retain partial transparency. |
Which workflow should you choose?
Use GIMP when you want a documented alpha-channel and PNG-export workflow with selection, path, and mask control. Use Photoshop when its Remove Background Quick Action is a useful starting point and you want to refine the generated mask manually. In either editor, the final quality depends on inspecting the subject boundary and choosing an alpha-capable PNG export.
For a flat logo or icon, start with a simple selection and verify hard edges. For product photography, use a mask and check for color fringes. For hair, glass, shadows, or smoke, expect to refine partial transparency carefully. Do not judge an edge only on the same color as the original background.
Performance, reliability, and file-size notes
Background removal itself is an editing task; the most reliable workflow is to keep the original and a reversible mask, inspect the result, and verify the exported file. The amount of edge cleanup depends on contrast and detail, so an automatic selection should always be checked before it is used in a product page, presentation, or batch of assets.
PNG compression does not require turning transparency off. File size depends on image dimensions, color detail, and export settings. If the PNG is too large, resize it to the dimensions actually needed or reduce color complexity where appropriate, then verify alpha again. Avoid switching to JPEG solely to shrink a transparent asset: it will replace transparency with a solid background. For assets with soft edges, avoid PNG8 because its two-state transparency can create rough contours.
Or skip the browser setup
If what you need is a screenshot of a web page with a transparent background, ScreenshotNeo is a website screenshot API and MCP server for developers. It returns a screenshot or PDF from one GET request; see the API documentation for request options. A screenshot’s page background must itself be transparent for transparent page pixels; an image API does not turn an ordinary opaque page into a subject cutout.
curl -G "https://api.screenshotneo.com/v1/shot" -d access_key=YOUR_API_KEY --data-urlencode url=https://stripe.com -o shot.webpimport requests
r = requests.get(
"https://api.screenshotneo.com/v1/shot",
params={"access_key": "YOUR_API_KEY", "url": "https://stripe.com"},
timeout=90,
)
open("shot.webp", "wb").write(r.content)const q = new URLSearchParams({ access_key: 'YOUR_API_KEY', url: 'https://stripe.com' });
const res = await fetch(`https://api.screenshotneo.com/v1/shot?${q}`);
const bytes = new Uint8Array(await res.arrayBuffer());
await import('node:fs/promises').then(fs => fs.writeFile('shot.webp', bytes));ScreenshotNeo removes cookie banners, newsletter popups, and chat widgets before capture. Bot checks, blank pages, and failed loads are never billed. Its MCP server lets AI agents take screenshots, and the free plan includes 1,000 screenshots a month with no card; paid plans start at $5 for 3,000. Start with 1,000 free screenshots a month, no card required.
FAQ
Can I make a background transparent without installing an editor?
This workflow requires an editor or background-removal service that can produce an alpha channel. If you use a service, download a PNG that preserves transparency and verify it against a contrasting background.
Does renaming a JPG to PNG create transparency?
No. Renaming changes the filename, not the pixel data. Remove the background in an editor and export the result as PNG.
Why does my transparent PNG look white in a preview?
Some viewers display transparent pixels against white. Open it in an editor and place a contrasting layer behind it to confirm whether alpha is present.
Should I flatten the file before export?
Keep the editable layered source. Export a PNG copy with transparency; flatten only if your delivery requirements call for a single layer and you have confirmed the alpha is retained.


