How to Embed Generated Images in HTML Documents with Python and Django
Learn when to use Base64 data URLs, Django static files, or ImageField media URLs to display generated images safely in HTML.

To embed generated image bytes directly in an HTML document, encode them as Base64 and place them in a data: URL:
data:image/png;base64,ENCODED_BYTESIn Django, use a different approach when the image is an application asset or a generated/uploaded file that should be served separately:
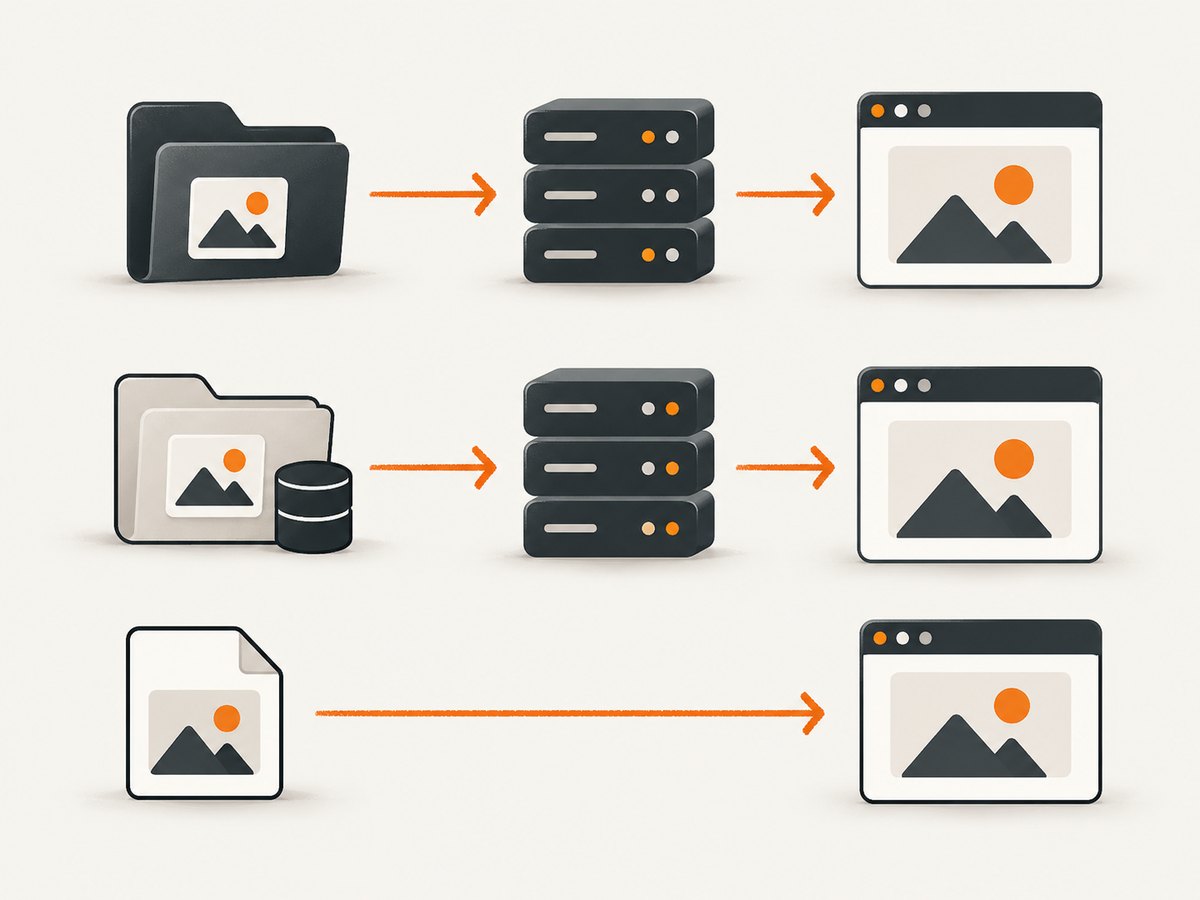
- Base64 data URL: the HTML contains the image bytes and is self-contained.
- Static file: the image ships with your application and the template references its URL with
{% static %}. - Media file: an
ImageFieldor storage backend saves the image and exposes its URL through{{ object.image.url }}.
Choose based on where the bytes should live. The sections below provide runnable Python and Django examples, deployment details, validation guidance, troubleshooting, and a browser-free option using ScreenshotNeo.
1. Embed image bytes with a Base64 data URL
A data URL has the form data:[media-type][;base64],data. For binary image data, identify the actual format and include the ;base64, marker. Python’s standard base64 module can encode the bytes.

import base64

# image_bytes must contain a PNG image.
encoded = base64.b64encode(image_bytes).decode("ascii")
data_url = f"data:image/png;base64,{encoded}"
Pass data_url to a Django template context:
# views.py
from django.shortcuts import render


def generated_image(request):
    image_bytes = create_png_bytes()  # Replace with your image generator.
    import base64

    encoded = base64.b64encode(image_bytes).decode("ascii")
    data_url = f"data:image/png;base64,{encoded}"
    return render(request, "images/generated.html", {"image_data_url": data_url})
<!-- templates/images/generated.html -->
<!doctype html>
<html lang="en">
  <body>
    <img src="{{ image_data_url }}" alt="Generated illustration">
  </body>
</html>
Use image/jpeg for JPEG bytes, image/webp for WebP, and another accurate media type for other formats. The declared type must match the bytes; changing only the label does not convert the file.
When a data URL is appropriate
Inline data is useful when the HTML must be portable as one file, such as an exported report or standalone email artifact. MDN documents data URLs as a way to embed small files inline; the references used for this guide do not define a universal size limit, so choose based on your document size and delivery needs rather than a fixed threshold. See the MDN data URL reference.
Validate before embedding
Do not trust a filename extension or a client-supplied MIME type. Validate that the bytes are an expected image format, reject unexpected formats, and apply any dimensions or file-size limits your application needs. If users can supply the source image, store it through a controlled storage path and validate its content before making it available.
2. Display a generated image from Django static files
Use static files for an image that is part of the deployed application, such as a sample image or a build-time generated asset. Namespace the path by app to avoid collisions:
my_app/
  static/
    my_app/
      generated-example.png
  templates/
    my_app/
      example.html
Load Django’s static template tag and generate the URL with {% static %}:
{% load static %}
<img src="{% static 'my_app/generated-example.png' %}" alt="Generated example">
Django’s static-files documentation explains that runserver can serve static files automatically during development when DEBUG is true. That helper is for development; production needs a proper static-file deployment strategy, such as collecting assets and serving them from the storage or web server configured for your deployment.
3. Save generated images as media with ImageField
Runtime-generated images and user uploads generally belong in media storage. An ImageField stores a path through Django’s configured storage and exposes a usable URL.
# models.py
from django.db import models


class Artwork(models.Model):
    title = models.CharField(max_length=200)
    image = models.ImageField(upload_to="artwork/")
    created_at = models.DateTimeField(auto_now_add=True)
Configure media settings:
# settings.py
MEDIA_ROOT = BASE_DIR / "media"
MEDIA_URL = "/media/"
Save generated bytes through a Django ContentFile:
# services.py
from django.core.files.base import ContentFile
from .models import Artwork


def save_generated_png(title: str, image_bytes: bytes) -> Artwork:
    artwork = Artwork(title=title)
    artwork.image.save("generated.png", ContentFile(image_bytes), save=True)
    return artwork
Render the stored URL:
{% if artwork.image %}
  <img src="{{ artwork.image.url }}" alt="{{ artwork.title }}">
{% endif %}
The Django ImageField reference describes the field’s storage behavior and its .url attribute. The database stores the file path relative to MEDIA_ROOT; the image bytes are managed by the configured storage backend. That backend may be local storage or a remote service, so production URL and access behavior depend on your storage configuration.
Development media serving
# urls.py (development only)
from django.conf import settings
from django.conf.urls.static import static
from django.urls import path

urlpatterns = [
    # your URL patterns
]

if settings.DEBUG:
    urlpatterns += static(settings.MEDIA_URL, document_root=settings.MEDIA_ROOT)
Django documents this helper for local development. It is not a production media server; production media requires a deployment setup appropriate to your storage and access requirements.
4. Complete Django example: generate, save, and render
The following view assumes create_png_bytes() returns valid PNG bytes from your image-generation library.
# views.py
from django.shortcuts import get_object_or_404, redirect, render
from django.core.files.base import ContentFile
from .models import Artwork


def create_artwork(request):
    image_bytes = create_png_bytes()  # Your generator returns PNG bytes.
    artwork = Artwork(title="Generated artwork")
    artwork.image.save("generated.png", ContentFile(image_bytes), save=True)
    return redirect("artwork-detail", pk=artwork.pk)


def artwork_detail(request, pk):
    artwork = get_object_or_404(Artwork, pk=pk)
    return render(request, "artwork/detail.html", {"artwork": artwork})
<!-- templates/artwork/detail.html -->
<h1>{{ artwork.title }}</h1>
{% if artwork.image %}
  <img src="{{ artwork.image.url }}" alt="{{ artwork.title }}">
{% else %}
  <p>No image is available.</p>
{% endif %}
If the image must be embedded into an exported HTML file instead, read the stored bytes, encode them, and pass the resulting data URL to the export template:
import base64


def image_data_url(file_field) -> str:
    with file_field.open("rb") as image_file:
        encoded = base64.b64encode(image_file.read()).decode("ascii")
    return f"data:image/png;base64,{encoded}"
Only use the PNG media type in that helper when the stored bytes are actually PNG. Keep format detection tied to your generation and validation logic.
5. ImageField validation and Pillow
Django’s ImageField form validation depends on Pillow supporting the image format. Install Pillow in the environment that validates images and ensure the formats you accept are supported. The Django form-field documentation notes that validation uses Pillow and closes the underlying uploaded-file descriptor afterward. Metadata such as dimensions may remain available, but code that reads pixels or raw content may need to reopen the file.
from PIL import Image


def inspect_image(field_file):
    with field_file.open("rb") as stream:
        with Image.open(stream) as image:
            image.verify()
    # Reopen before pixel operations because verify() consumes the stream.
    with field_file.open("rb") as stream:
        with Image.open(stream) as image:
            return image.size, image.format
Validate file content, dimensions, and size before processing. Treat user-supplied file placement as a security boundary and use storage controls appropriate to your deployment.
6. Choosing between inline, static, and media URLs
| Need | Method | Template form |
|---|---|---|
| The HTML must contain image bytes | Base64 data URL | <img src="{{ image_data_url }}"> |
| The image ships with the application | Django static files | {% static 'app/file.png' %} |
| The image is uploaded or generated at runtime | Media storage and ImageField |
{{ object.image.url }} |
Inline data makes a document self-contained. Static and media URLs keep bytes in separately served files and let your deployment handle storage and delivery. The consulted documentation does not provide a universal performance benchmark or size cutoff, so measure your own pages when choosing between them.
7. Troubleshooting common errors
The image is broken and the HTML shows a long string
Check that the value starts with data:image/..., includes ;base64,, and contains ASCII Base64 text. A raw byte string or a missing comma is not a valid data URL.
The browser reports an unsupported image
The media type probably does not match the bytes. Use image/png, image/jpeg, or image/webp according to the actual generated format. Encoding JPEG bytes as PNG does not convert them.
{% static %} is rendered literally
Add {% load static %} at the top of the template and verify that the path is under an app’s static/ directory. Confirm your static settings and production collection/deployment process.
The static URL works locally but returns 404 in production
Django’s development server is not a production static server. Configure your production web server or storage, run the static collection step required by your deployment, and point STATIC_URL at the resulting location.
object.image.url raises an error
The field may be empty, the object may not have been saved, or the storage backend may not be configured. Guard the template with {% if object.image %} and inspect the saved field name and storage settings.
ImageField rejects a file
Install Pillow and verify that the bytes are a supported image format. Do not rely on the filename extension. If validation succeeds but later pixel reads fail, reopen the file because validation can close the underlying descriptor.
The generated image is missing after a deployment
Media files are separate from application code and static assets. Confirm that your production storage persists media, that the generated file was uploaded to that storage, and that its URL is reachable under the configured access policy.
8. Performance, reliability, and cost considerations
- Document size: Base64 puts encoded bytes into the HTML, increasing the amount of document data. Keep inline images limited to cases where self-containment is valuable.
- Caching: Static and media URLs can be served and cached independently from HTML. Configure cache behavior in the storage or delivery layer you use.
- Failure isolation: A separately served image can fail independently of the HTML. A data URL travels with the document but makes that document depend on the embedded bytes being valid.
- Storage durability: Local
MEDIA_ROOTis not automatically durable across hosts or releases. Use storage appropriate to your deployment. - Validation cost: Decode and inspect images before expensive processing, and enforce dimensions and file-size limits to control resource use.
There is no single best method for every generated image. Decide whether the document must be portable, whether the image is a deployed asset, and whether the file should be managed by runtime media storage.
9. Or skip the browser setup
If your goal is to capture a rendered page or generated HTML as an image, ScreenshotNeo provides a GET endpoint that returns PNG, JPEG, WebP, or PDF. The request accepts the URL and capture options, so you do not need to maintain browser automation for this step.
Cookie banners, newsletter popups, and chat widgets are removed before the shot. Bot checks, blank pages, timeouts, failed loads, and cache hits are not billed, and the response identifies the result with X-Page-Verdict and X-Billed headers. ScreenshotNeo also provides an MCP server with take_screenshot, get_page_info, and capture_pdf for AI agents.
See the ScreenshotNeo API documentation for all options.
curl -G "https://api.screenshotneo.com/v1/shot" \
  -d access_key=YOUR_API_KEY \
  --data-urlencode url=https://stripe.com \
  -o shot.webp
import requests

r = requests.get(
    "https://api.screenshotneo.com/v1/shot",
    params={"access_key": "YOUR_API_KEY", "url": "https://stripe.com"},
    timeout=90,
)
r.raise_for_status()
open("shot.webp", "wb").write(r.content)
const q = new URLSearchParams({
  access_key: 'YOUR_API_KEY',
  url: 'https://stripe.com'
});
const res = await fetch(`https://api.screenshotneo.com/v1/shot?${q}`);
if (!res.ok) throw new Error(`Screenshot failed: ${res.status}`);
const image = Buffer.from(await res.arrayBuffer());
require('fs').writeFileSync('shot.webp', image);
ScreenshotNeo includes full-page capture with lazy images loaded, CSS-selector element capture, dark mode, device presets and custom viewports, retina scale, custom CSS and JavaScript, waits, request blocking, headers, cookies, user agents, authorization, timezone, geolocation, transparent backgrounds, resizing, caching with a chosen TTL, signed links, asynchronous jobs with signed webhooks, bulk capture for up to 100 URLs per call, a usage API, and an OpenAPI specification. Every feature is on every plan. Pricing starts with 1,000 free shots per month without a card; paid plans start at $5 for 3,000 shots. Create a free ScreenshotNeo account.
10. FAQ
Can I put a generated image directly in an HTML attribute?
Yes. Put a correctly formed Base64 data URL in src. For Django-generated pages, pass the data URL through the template context.
Should every Django image use Base64?
No. Use static files for deployed assets and media storage for uploaded or runtime-generated files. Inline only when the HTML must carry the bytes itself.
Does ImageField store image bytes in the database?
By default it stores a path managed by the configured storage and exposes the file through .url. Storage behavior can be customized.
Why does Pillow matter if I already have PNG bytes?
Django uses Pillow for ImageField validation and image metadata. Pillow must support the formats your application accepts.
Can I use a ScreenshotNeo response as a Django image URL?
Yes, if your page can access the response URL or you save the returned bytes into your media storage. Follow the API documentation for signed links and capture options.


