How to Generate Instagram Grid Images Automatically
Build a repeatable Instagram grid workflow: design or generate images, split them into ordered tiles, automate publishing, and handle common API failures.
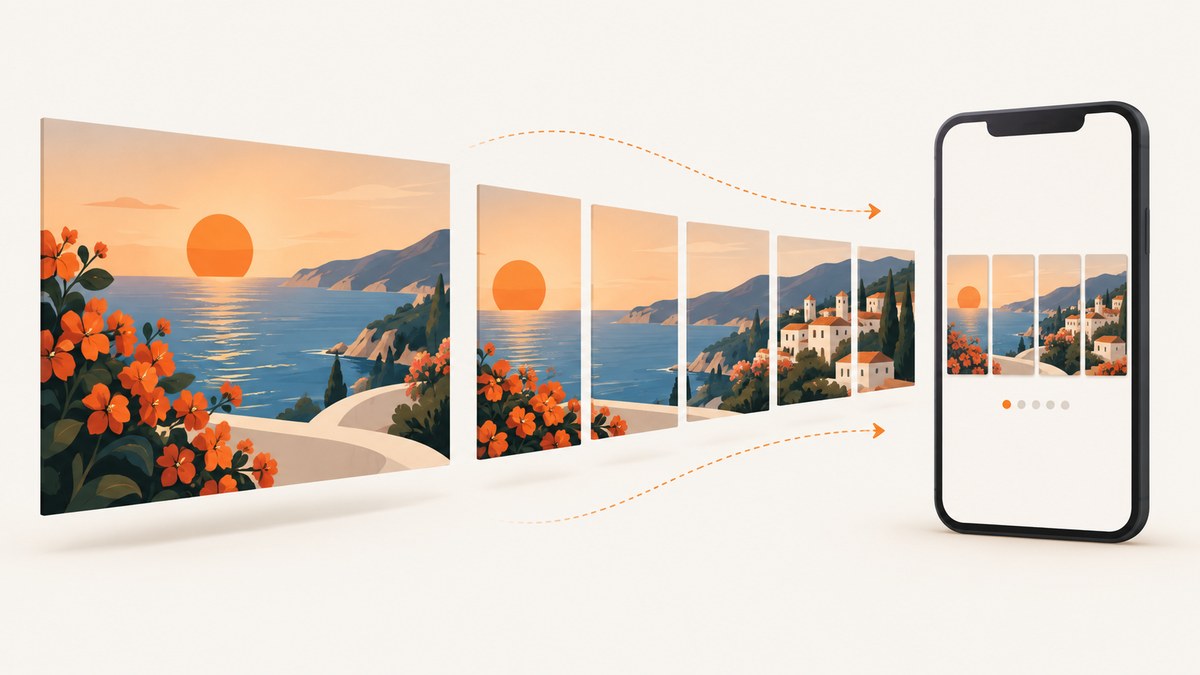
To generate Instagram grid images automatically, separate the work into four stages: create a master visual or individual slides, split or export them as correctly ordered images, pass those assets through an automation workflow, and publish them as an Instagram carousel. Canva is a straightforward no-code option; Zapier can connect a spreadsheet or other trigger to asset creation and publishing; a custom integration can use Meta’s Instagram API. The critical details are consistent dimensions, deterministic slide order, accessible image URLs, and a reliable record of publishing status.
This guide focuses on carousel posts: a set of images viewers swipe through. A “grid” can also mean a panoramic image split into tiles for a profile feed. The same splitting steps apply, but the publishing order and preview differ. Make the complete image and check its seams before scheduling either format.
1. Choose the workflow that fits your input
Start from what you already have, and choose the simplest process that meets your control and automation needs.
| Starting point | Good fit | Tradeoff |
|---|---|---|
| One finished panorama or mosaic | Canva splitter or an image-processing script | You must verify tile order, seams, and compression. |
| Designed slides or a content template | Canva pages, then manual upload or Zapier | Export and publishing are distinct steps unless automated. |
| Spreadsheet or database row | Zapier workflow or custom service | Requires stable asset storage, account access, and error handling. |
| Text prompt for a four-panel concept | Apiframe’s documented 2×2 image-grid action | Prompt-generated variation is less suited to exact seams and brand typography. |
Canva documents its image splitter for dividing an image into equal segments for uses including Instagram carousel grids. Its Instagram creator supports multi-page carousel designs and lists JPEG/JPG, PNG, HEIC/HEIF, and WebP among common image formats. Check the exported files and the current Instagram publishing requirements before relying on a particular format.
2. Prepare the grid and split it correctly
Design a panorama or mosaic
- Create one master canvas with the intended final composition. For a panorama, make its width an exact multiple of the number of columns. For a rectangular mosaic, make both width and height divisible by the chosen column and row counts.
- Keep faces, logos, and important text away from tile boundaries. A detail on a seam can look broken when tiles are viewed individually or loaded out of order.
- Choose one final aspect ratio and consistent dimensions for every tile. Check any current Instagram media requirements before publishing; supported dimensions and limits can change.
- Split the master into equal rectangles. Use a splitter such as Canva’s, or an image library in your own pipeline. Export every tile at the intended quality, then inspect for compression and color changes.
- Name tiles with a sortable index, such as
post-2026-09-29-01.jpg,post-2026-09-29-02.jpg. Do not depend on filesystem enumeration order.
Canva notes that splitting can affect image quality through compression. Compare the exported tiles with the master at full size, especially around thin lines and text. If compression is visible, try a different export setting or split from a higher-quality source.

Split with Python when you need a repeatable pixel-level process
The following local script uses Pillow to divide a source image into a row-major grid. Install Pillow with python -m pip install Pillow, save this as split_grid.py, and run python split_grid.py master.jpg output 3 1 to create three columns and one row. It rejects dimensions that would create unequal tiles rather than silently dropping pixels.
from pathlib import Path
import sys
from PIL import Image

if len(sys.argv) != 5:
    raise SystemExit("Usage: python split_grid.py INPUT OUTPUT_DIR COLUMNS ROWS")

source = Path(sys.argv[1])
out_dir = Path(sys.argv[2])
cols, rows = int(sys.argv[3]), int(sys.argv[4])
if cols < 1 or rows < 1:
    raise SystemExit("Columns and rows must be positive integers")

with Image.open(source) as original:
    image = original.convert("RGB")
    width, height = image.size
    if width % cols or height % rows:
        raise SystemExit(
            f"Image is {width}x{height}; dimensions must divide evenly by "
            f"{cols} columns and {rows} rows"
        )
    tile_w, tile_h = width // cols, height // rows
    out_dir.mkdir(parents=True, exist_ok=True)
    index = 1
    for row in range(rows):
        for col in range(cols):
            box = (col * tile_w, row * tile_h,
                   (col + 1) * tile_w, (row + 1) * tile_h)
            image.crop(box).save(out_dir / f"tile-{index:02d}.jpg", quality=95)
            index += 1
print(f"Wrote {cols * rows} tiles of {tile_w}x{tile_h} to {out_dir}")
This script writes tiles left-to-right, then top-to-bottom. That ordering is explicit and reproducible. Change the output format and quality only after checking the current upload support and visually reviewing the files. For transparency, preserve an alpha channel by avoiding the RGB conversion and save to a format that retains it; confirm the platform accepts the resulting file before publishing.
Or export separate slides
If every carousel panel is designed independently, there is no need to stitch and split a panorama. Create each page using the same dimensions and visual system, export them as separate files, and assign an explicit slide index. This avoids seams caused by resampling, though you still need to check that type size, margins, and image crops remain consistent across slides.
3. Automate asset preparation and publishing
No-code path: Canva and Zapier
Canva is a practical first stop when a person can review and export the design. For a scheduled pipeline, Zapier documents connections between content sources, Canva assets, webhooks, and Instagram publishing. Its documented carousel workflow can take a spreadsheet row, generate caption and slide text, request slide images through webhooks, create Instagram carousel media, and mark the row as published.
- Store a row per planned post. Include a stable post ID, topic, caption, asset references, ordered slide URLs or paths, scheduled time, and a status such as
ready. - Trigger the workflow when a row is ready or on a schedule. Ensure the trigger is idempotent: a retry should not publish a duplicate post.
- Create or retrieve the slide assets. For a splitter flow, finish splitting before the publish action and retain the explicit sequence numbers.
- Provide the publishing step with the slide assets in order, plus the caption. A carousel is a collection of media items, so ensure the automation maps every intended slide rather than only the first image.
- After success, write the returned publish ID and status back to the source row. On failure, record the error and leave the row in a state that can be safely retried.
Zapier’s Instagram integration supports Instagram Business or Creator accounts, requires the professional account to be linked to a Facebook Page, and offers a Publish Photo(s) action for a carousel. Its triggers use polling, so a scheduled or row-change trigger may not fire immediately. Account permissions and polling delay are operational dependencies, not image-splitting problems.
Prompt-first path: Apiframe
Apiframe documents a Create Image Grid action that generates a 2×2 image grid from a prompt, along with variation and upscaling actions. Its Instagram publishing action can publish one or more photos as a post or carousel. This can shorten the path from an idea to four related panels. Use a review step if exact brand typography, precise panel boundaries, or repeatable campaign art direction matters; generated panels may need correction before they are suitable for publication.
4. Build a custom Instagram API pipeline
A custom service gives you direct control over asset handling, ordering, retries, and audit records. Meta’s Instagram API documentation describes authenticated professional-account operations, access tokens, and media containers. The broad flow is: authenticate the professional account, make each image reachable to the API, create a media container for each tile, assemble the carousel, publish it, and persist the result.
Meta’s API requires authentication and appropriate account access. The exact endpoints, permissions, media requirements, and limits depend on the API version and account setup. Those details change, so consult Meta’s current documentation before implementing production requests. The code below shows the orchestration shape with placeholders; it is not a complete API client or a claim about a permanent endpoint contract.
async function publishGrid({ token, accountId, imageUrls, caption }) {
  if (!token || !accountId) throw new Error("Missing API credentials");
  if (!Array.isArray(imageUrls) || imageUrls.length < 2) {
    throw new Error("Provide at least two ordered image URLs");
  }
  if (new Set(imageUrls).size !== imageUrls.length) {
    throw new Error("Duplicate tile URL detected");
  }

  // Implement these functions against the current Meta API docs.
  // createImageContainer must return the ID for one image URL.
  const childIds = [];
  for (const imageUrl of imageUrls) {
    childIds.push(await createImageContainer({
      token, accountId, imageUrl
    }));
  }
  const carouselId = await createCarouselContainer({
    token, accountId, childIds, caption
  });
  const publishResult = await publishContainer({
    token, accountId, containerId: carouselId
  });
  return { carouselId, publishResult };
}
Keep this code sequential until you know the current API’s processing behavior and rate limits. If you later parallelize container creation, preserve the original array index when collecting responses. A concurrency limit avoids a burst of requests, while a final ordered child-ID list prevents an out-of-order carousel.
Secure credentials and image delivery
- Keep access tokens in a secret store or protected environment variables. Do not put them in browser code, spreadsheets, source control, or public logs.
- Use public image URLs only when the publishing workflow requires the remote service to fetch the media. A URL should resolve without a login page, be available for long enough to complete processing, and return the intended image with the right content type.
- Use signed or time-limited asset URLs only when their expiry leaves enough time for retries and media processing.
- Restrict access to automation logs because they may contain tokens, image URLs, captions, or customer content.
- Store a post ID, tile order, content hash, API response, and final status. This makes retries and support investigations safer.
5. Check order, crops, and publication state
Do a preview before sending a post to the API. View the complete panorama as one image, then inspect each tile at its final display size. Confirm the panel order matches the intended swipe sequence. For a profile mosaic, verify the tile arrangement against the profile layout and the order in which Instagram will display new posts.
Use a simple pre-publish checklist:
- Every tile has the same intended dimensions and file type.
- Files have unique names and explicit numeric ordering.
- The first slide works as a standalone cover and the caption is attached once.
- Text, faces, and key visual elements are not cut at seams or by crops.
- Image URLs are reachable and do not require an interactive session.
- The professional account, linked Facebook Page, and permissions are correct.
- The source record is marked as publishing before the request begins, then updated with the final result.
6. Troubleshooting common failures
| Symptom | Likely cause | Fix |
|---|---|---|
| Tile edges do not line up | Unequal crop boundaries, scaling, or source dimensions not divisible by the grid. | Split from the original master with integer boundaries; reject or deliberately pad uneven dimensions instead of rounding silently. |
| Carousel panels appear in the wrong order | Filesystem or workflow returned assets in an unspecified order. | Sort by an explicit numeric index and pass an ordered array; log the index beside each container ID. |
| Text or a face is cut between panels | Important content sits on a split line, or a platform crop changes the composition. | Move content inward, preview the full composition, and inspect each exported image at its final display size. |
| Image is blurry or has artifacts | Repeated compression, resizing, or splitter export reduced quality. | Start from the highest-quality master, avoid multiple lossy exports, and compare the exported tiles with the source. |
| Automation cannot find or fetch an image | The URL is private, expired, blocked, redirects to a login page, or returns HTML. | Test the URL outside your logged-in browser; confirm it returns the actual image and remains reachable through processing and retries. |
| Instagram connector rejects the account | The account is personal, lacks required access, or is not linked to a Facebook Page. | Use a supported Business or Creator account, link its Facebook Page, and reconnect with the necessary permissions. |
| A scheduled post appears late | A polling trigger has not checked the source yet, or an upstream job is delayed. | Account for polling intervals, check each workflow step’s run history, and avoid treating trigger time as publish time. |
| Retries create duplicate posts | The workflow retries after an ambiguous timeout without checking whether publishing succeeded. | Persist the request and container IDs, reconcile uncertain outcomes before retrying, and use an idempotency key in your own job system. |
| API request returns an authorization error | Expired token, missing permission, wrong account ID, or changed API requirements. | Refresh or replace credentials as applicable and verify the current Meta permissions and account setup. |
7. Performance, reliability, and cost
Image preparation is usually easy to parallelize; publication should be controlled. Splitting local files is deterministic and cheap in API terms, but image decoding, resizing, and encoding use CPU and memory proportional to the source image. For a batch service, process large inputs with bounded concurrency and remove temporary files after upload. Retain the source master and output hashes so a retry can reuse the same assets.
Publishing adds external dependencies: account credentials, permissions, asset hosting, network access, and the current platform API contract. Use bounded retries for transient failures, exponential backoff with jitter, and a maximum attempt count. Do not retry permanent validation or authorization failures without fixing the cause. Save each stage’s status so an operator can resume at asset upload, container creation, or publication rather than regenerate everything.
No universal current Instagram API limit matrix or processing-time benchmark is established by the sources for this guide. Check current Meta documentation for rate limits, supported formats, dimensions, and permissions before launch. For no-code flows, include the automation subscription and any image-generation or storage charges in the workflow’s cost; the research does not establish current prices for Canva, Zapier, or Apiframe.
8. ScreenshotNeo for screenshot-based content
If your grid includes website screenshots—such as a product comparison carousel, release roundup, or landing-page teardown—you can capture those source visuals with ScreenshotNeo, a screenshot API and MCP server from Yorker Media. It does not split or publish Instagram tiles; use it to create the web-page image assets that enter your design workflow. See the API documentation for request options.

Or skip the browser setup
Send one GET request for a page screenshot:
curl -G "https://api.screenshotneo.com/v1/shot" -d access_key=YOUR_API_KEY --data-urlencode url=https://stripe.com -o shot.webpimport requests
r = requests.get("https://api.screenshotneo.com/v1/shot", params={"access_key": "YOUR_API_KEY", "url": "https://stripe.com"}, timeout=90)
open("shot.webp", "wb").write(r.content)const q = new URLSearchParams({ access_key: 'YOUR_API_KEY', url: 'https://stripe.com' });
const res = await fetch(`https://api.screenshotneo.com/v1/shot?${q}`);Cookie banners, popups, and chat widgets are removed before the shot. Bot checks, blank pages, and failed loads are never billed, and response headers say whether the page was clean and billed. An MCP server lets AI agents use screenshot tools. The free plan includes 1,000 screenshots a month with no card; paid plans start at $5 for 3,000. Sign up for the free plan.
FAQ
Can I automate a grid without coding?
Yes. Design and split in Canva, then upload manually or connect a spreadsheet-driven publishing flow with Zapier. Review the final slide order and preview before publishing.
Should I split one panorama or design separate slides?
Split a panorama when the visual must connect across panels. Design separate slides when each panel needs independent content, a clear cover, or text that should not cross seams.
Can I publish from a personal Instagram account through the documented Zapier integration?
The cited integration documentation specifies Business or Creator accounts linked to a Facebook Page. Confirm the current connector requirements before building around it.
Can ScreenshotNeo publish my carousel?
No. ScreenshotNeo captures web pages as image or PDF files. Use a design or image workflow to arrange the tiles and an Instagram publishing integration or API to publish them.


