How to Print a Website Image Across Multiple Pages
Turn a website image into a tiled poster: extract it, save a stable PDF, set Acrobat Poster scale, overlap, marks, and print correctly.

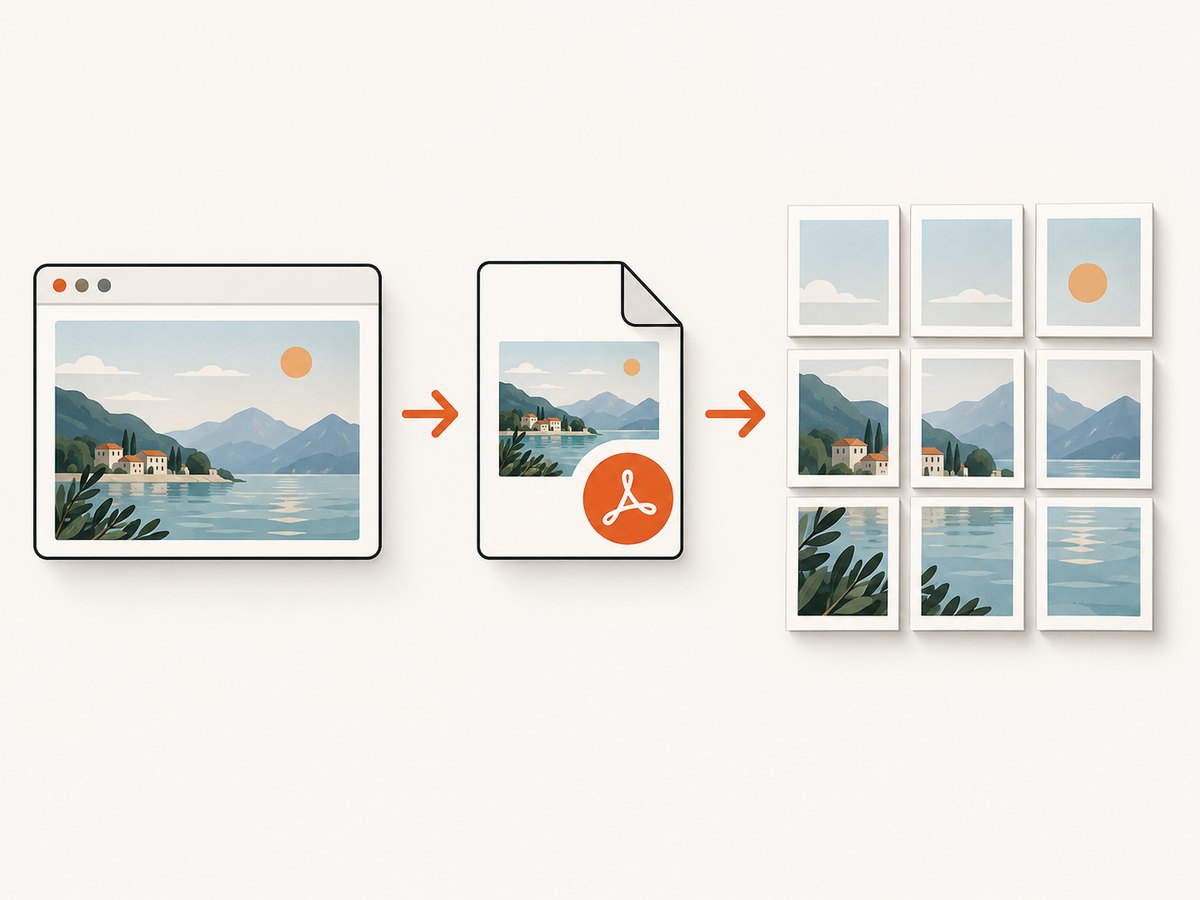
Short answer: open the image by itself, save it as a PDF, open that PDF in Adobe Acrobat or Acrobat Reader, choose Print > Poster, set the finished scale, add overlap, enable cut marks and labels, inspect the preview, and print without a second scaling pass. Acrobat calculates how many sheets are needed from the image size, paper size, margins, orientation, scale, and overlap.
This workflow prints one large website image across ordinary Letter, A4, or other sheets. It avoids printing the surrounding webpage, menus, advertisements, and responsive layout. The same method works for a map, photograph, illustration, diagram, or banner that you want to assemble into a larger poster.
What you need
- The image’s direct URL or a browser page containing the image.
- Firefox, Chrome, Edge, or another browser that can save or print to PDF.
- Adobe Acrobat or Acrobat Reader for Poster tiling.
- A printer, paper, a way to trim edges, and removable tape.
A print shop is usually easier when you need one very large sheet, borderless output, or professional finishing. Home tiling is useful when the final size can be assembled from standard paper.
Step 1: isolate the image from the website
Firefox
- Right-click the image.
- Choose Open Image in New Tab. If it is a CSS background, choose View Background Image when that option appears.
- Confirm that the new tab contains only the image, without the page’s navigation or other content.
- Use the browser’s print command and select Save to PDF if you want to create the stable source file now.
Firefox’s print dialog exposes paper size, scale, pages per sheet, margins, format, two-sided printing, and background controls under More settings. For a poster, choose the paper and orientation that match your printer, and keep the browser scale at 100% when creating a source PDF unless you intentionally want to change the document size.
Other browsers
In Chromium-based browsers, right-click and open the image in a new tab, then use Print and choose Save to PDF. If the context menu does not expose the original image, inspect the page source or developer tools for the image URL, or use the site’s download control when available. Do not print the page view if it contains a gallery layout, captions, cookie controls, or a responsive crop.
When the image is protected or rendered by a canvas
Some sites draw an image into a canvas, assemble it from tiles, or require a login. Save only content you are allowed to reproduce. If there is no direct image file, use the site’s export or download feature. A screenshot can preserve what is visible, but it may have different dimensions and less detail than the original asset.
Step 2: create a stable printable PDF
- In the image-only tab, open Print.
- Choose Save to PDF (or Microsoft Print to PDF on Windows).
- Select the paper size and orientation you expect to use later.
- Check the preview for cropping, blank margins, and unexpected rotation.
- Save the file with a useful name, such as
website-image-poster.pdf.
A PDF fixes the page content before you start tiling. It also lets Acrobat calculate the sheet layout consistently instead of depending on a live webpage, changing CSS, or a browser zoom level.
Step 3: tile the PDF in Acrobat
- Open the PDF in Adobe Acrobat or Acrobat Reader.
- Choose File > Print.
- Under Page Sizing & Handling, choose Poster. Adobe describes this as splitting one large page across multiple sheets.
- Set Tile Scale. Use 100% when the PDF page already has the exact intended finished size. Increase the percentage to make a larger poster; decrease it to make a smaller one.
- Set an Overlap. A modest repeated strip gives you alignment tolerance and helps compensate for printer margins.
- Enable Cut marks and Labels when available. Cut marks guide trimming; labels identify the tile’s position.
- Choose the correct printer, paper size, orientation, and one-sided printing.
- Review the preview and sheet count before printing.
Adobe’s Poster option is designed for large documents, posters, and banners that must be split across sheets. The exact controls vary by Acrobat release, operating system, and printer driver, but the concepts remain Tile Scale, Overlap, preview, and page marks.
How to choose scale, overlap, and orientation
| Control | What it changes | Practical choice |
|---|---|---|
| Tile Scale | The finished size of the PDF page and the number of sheets | 100% for true-size output; change deliberately for enlargement or reduction |
| Overlap | Repeated image area on neighboring sheets | Use enough to align seams without wasting excessive paper |
| Cut marks | Trim guides around tiles | Enable when you will trim edges |
| Labels | Tile identifiers for assembly order | Enable for any layout larger than a few sheets |
| Orientation | How each sheet is rotated | Choose the direction that gives the largest printable area and the fewest awkward seams |
There is no universal page count. Acrobat calculates it from source dimensions, target scale, paper dimensions, printer margins, and overlap. A larger scale increases the finished poster and sheet count. A smaller scale reduces both.
Printer margins and the hidden printable area
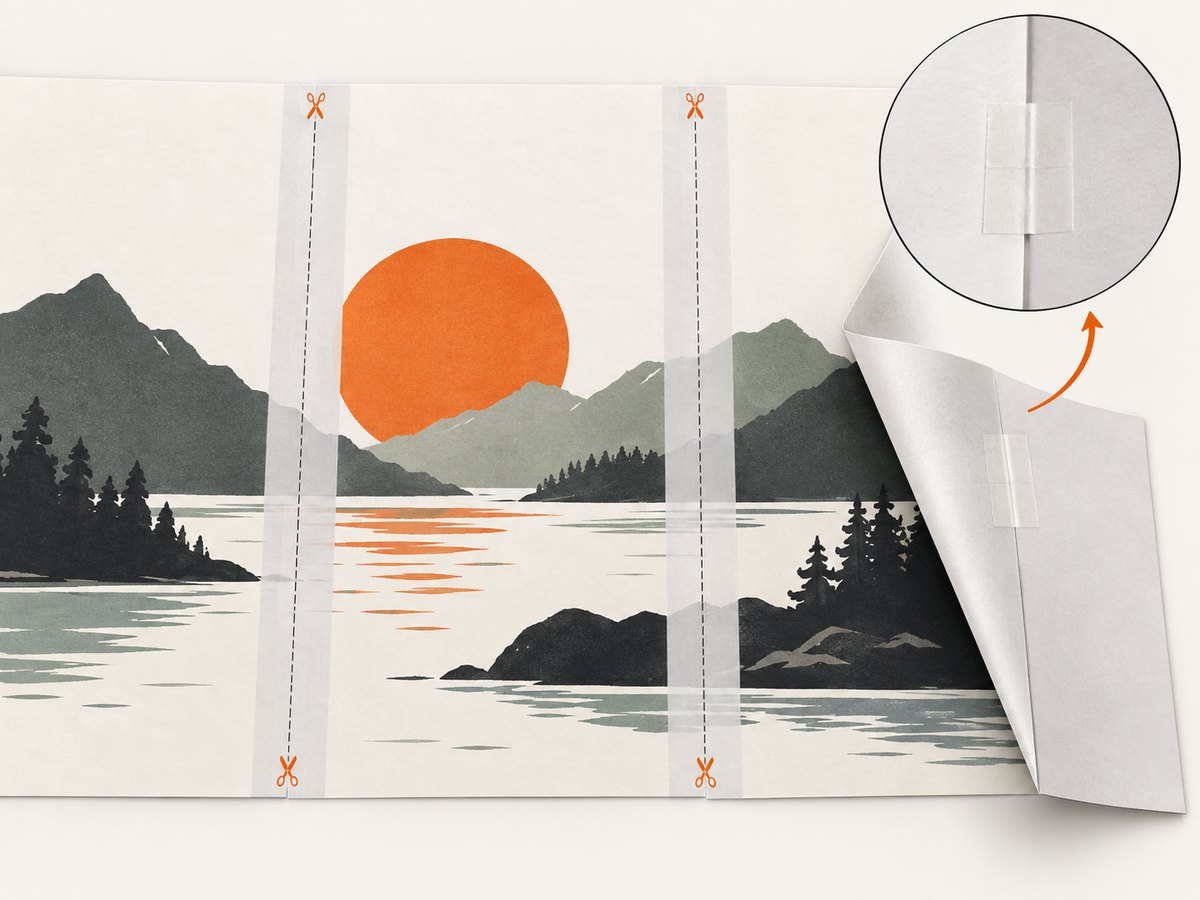
Every desktop printer has a nonprinting region at the margins. Even if the paper is Letter or A4, the usable rectangle is smaller than the physical sheet unless the printer supports borderless printing. This is why overlap matters: adjacent sheets can share content where one sheet cannot print all the way to its edge.
Do not compensate by changing Tile Scale and then allowing the printer driver to fit the result again. That creates two scaling stages and can make the final poster smaller than planned. If you need an exact finished dimension, record the intended scale, use Acrobat’s preview, and disable driver options named Fit, Shrink oversized pages, Scale to fit, or similar.
Printing checklist
- Open only the image, not the full webpage.
- Save a PDF and verify its orientation.
- Choose Acrobat’s Poster mode.
- Set Tile Scale intentionally.
- Add overlap for alignment.
- Turn on cut marks and labels.
- Confirm the paper size and printer orientation.
- Inspect every preview page for clipped content.
- Disable unintended printer-driver scaling.
- Print one test tile before committing the entire job.
Assembly: turn sheets into one poster
- Keep the printed pages in the order shown by the labels.
- Lay them on a clean surface in rows and columns.
- Trim only the edges needed for a clean seam; leaving one overlapping edge can make alignment easier.
- Match repeated image content in the overlap area.
- Join pages from the back with removable tape. Add permanent adhesive only after the complete layout is correct.
- Check the outside dimensions and straighten the grid before mounting.
For a polished result, use a rotary trimmer rather than scissors, and make all cuts against a straightedge. If the poster will be handled, mount the assembled sheets to a backing board after the seams are aligned.
Common problems and fixes
The print includes the whole webpage
Cause: the page itself was printed instead of the image resource. Fix: right-click the image and open it in a new tab, or use View Background Image. Save that image-only view to PDF.
The poster is unexpectedly small
Cause: Acrobat’s Tile Scale is below the intended value, or the printer driver applied Fit/Shrink after Acrobat. Fix: set the desired Tile Scale, then disable the second scaling option and compare the preview with a ruler or known dimension.
Important content is clipped
Cause: the source image was cropped by a responsive webpage, the PDF orientation is wrong, or a printer margin cuts off an edge. Fix: open the original image directly, regenerate the PDF, choose the correct orientation, add overlap, and inspect the Poster preview.
There are too many sheets
Cause: a high Tile Scale, small paper, wide overlap, or a portrait orientation that wastes printable width. Fix: lower the scale, choose a more suitable orientation, reduce overlap while keeping enough alignment room, or use larger paper.
Seams do not line up
Cause: no overlap, inconsistent trimming, paper movement, or a driver scaling difference between pages. Fix: use a consistent overlap, enable cut marks, trim with a straightedge, verify that every page used the same printer settings, and tape from the back after matching repeated details.
The image is blurry when enlarged
Cause: the source file does not contain enough detail for the chosen finished size. Tiling increases physical size; it does not create new image detail. Fix: locate a higher-resolution original, print at a smaller scale, or accept the intended viewing distance and texture.
The browser cannot save the image
Cause: the image is a background, canvas, protected resource, or requires authentication. Fix: use View Background Image, the site’s own download/export control, or an authorized screenshot of the visible canvas. Do not bypass access controls.
Menu names differ from this guide
Cause: Acrobat and printer-driver releases use different labels. Fix: look for the concepts Page Sizing & Handling, Poster, Tile Scale, Overlap, cut marks, labels, and preview.
Performance, reliability, and cost decisions
For one image, the browser-to-PDF-to-Acrobat workflow is usually the simplest and gives precise control over physical scale. Its reliability depends on the source page remaining available long enough to extract the image, the PDF preserving the intended dimensions, and the printer using consistent settings. Saving the PDF first removes the webpage from the later steps.
Paper and ink are the main consumables. Print a single test tile when scale or color matters, because a full poster can consume many sheets before you discover a rotation or scaling mistake. A print shop can be more economical when the target is one oversized sheet, borderless output, or durable finishing; home tiling avoids that service cost but adds trimming and assembly time.
Or skip the browser setup
If you need a clean source capture from a URL before printing, ScreenshotNeo returns a PNG, JPEG, WebP, or PDF from one GET request. Cookie banners, newsletter popups, and chat widgets are removed before the shot. Bot checks, blank pages, timeouts, failed loads, and cache hits are not billed, and the response identifies the result with X-Page-Verdict and X-Billed headers. An MCP server lets Claude, Cursor, and other MCP clients use take_screenshot, get_page_info, and capture_pdf.
Read the complete option list and authentication details in the ScreenshotNeo documentation. The examples below use the supplied API shape and save the returned image for your PDF workflow.
cURL
curl -G "https://api.screenshotneo.com/v1/shot" -d access_key=YOUR_API_KEY --data-urlencode url=https://stripe.com -o shot.webpPython
import requests
r = requests.get("https://api.screenshotneo.com/v1/shot", params={"access_key": "YOUR_API_KEY", "url": "https://stripe.com"}, timeout=90)
open("shot.webp", "wb").write(r.content)
Node.js
const q = new URLSearchParams({ access_key: 'YOUR_API_KEY', url: 'https://stripe.com' });
const res = await fetch(`https://api.screenshotneo.com/v1/shot?${q}`);
ScreenshotNeo supports full-page capture with lazy images loaded, element capture by CSS selector, dark mode, device presets and custom viewports, retina scale, PDF paper sizes and margins, custom CSS and JavaScript, clicks, selector or network-idle waits, blocked requests and resource types, headers, cookies, user agents, Authorization, timezone, geolocation, transparent backgrounds, resizing, cache TTLs, signed links, asynchronous jobs with signed webhooks, bulk capture of up to 100 URLs per call, a usage API, and an OpenAPI specification. The parameter names used by other screenshot APIs also work, which can simplify switching.
The Free plan includes 1,000 screenshots per month with no card. Paid plans start at $5 for 3,000 shots; yearly billing gives two months free, and every feature is available on every plan. Create a free ScreenshotNeo account to get started.
FAQ
Can I print directly from the webpage?
You can, but printing the image-only view or a saved PDF avoids page menus, ads, responsive crops, and changing layout. Acrobat Poster mode gives better control over tiling and assembly marks.
What scale should I use for a true-size poster?
Use 100% Tile Scale when the source PDF page already represents the intended physical size. Verify the result with the preview and disable any additional printer scaling.
How many pages will my poster require?
There is no fixed number. Acrobat calculates it from the image dimensions, Tile Scale, paper size, orientation, margins, and overlap.
Should I add overlap?
Yes, a modest overlap makes alignment easier and helps account for nonprinting printer margins. The exact value depends on your trimming and assembly method.
What if I need one large sheet?
Use a print shop that offers large-format or borderless printing. Home tiling is intended for assembling standard sheets.


