Create Product Marketing Images From a Product Catalog
Build consistent product marketing images across a catalog with a repeatable shoot, clean exports, and channel-ready image roles.

To create product marketing images from a catalog, standardize the shoot before photographing every SKU: organize originals, choose a consistent crop and background, keep the camera and lighting fixed, capture a hero plus useful details, and export channel-specific copies. A repeatable setup makes products look like they belong together while preserving the differences buyers need to see.
This guide covers a low-cost DIY workflow, image sizing and file roles, catalog organization, quality checks, and when an agency or AI-assisted editing workflow may fit better. The same process works whether you have ten products or hundreds.
1. Audit the catalog and define a visual standard
Start with an inventory rather than the camera. List each SKU, product variant, available original image, missing angle, and channel where the image will appear. Mark products that need special handling, such as reflective surfaces, transparent packaging, small controls, or multiple colors.
Choose a naming convention that connects an image to its product and purpose. For example:
SKU123-blue-hero-v1.jpg
SKU123-blue-detail-controls-v1.jpg
SKU123-blue-packaging-v1.jpg
Use a stable SKU or product ID first, then variant, view, and revision. Keep untouched camera originals in a separate archive. Generate resized, compressed, or retouched channel files from those masters so a later change does not require recovering detail from an already compressed export. Adobe Commerce recommends organizing catalog originals and establishing a file naming convention for large catalogs.
Write down a one-page visual standard before the shoot:
- Background color and surface
- Camera height, distance, angle, and lens or phone position
- Product scale and placement inside the frame
- Light direction, brightness, and shadow softness
- Hero-image crop and acceptable product margins
- Which views every product needs
Consistency should make comparison easier, not hide real product differences. Color variants should remain accurate, and imagery must not imply accessories or features that are not included.
2. Build a repeatable DIY photography setup
A basic tabletop setup can use a phone or camera, tripod, table, clean white background, and a reflector card. Shopify recommends keeping the camera and tripod in the same position throughout a shoot. Mark tripod feet and product placement with tape so a moved setup can be restored.
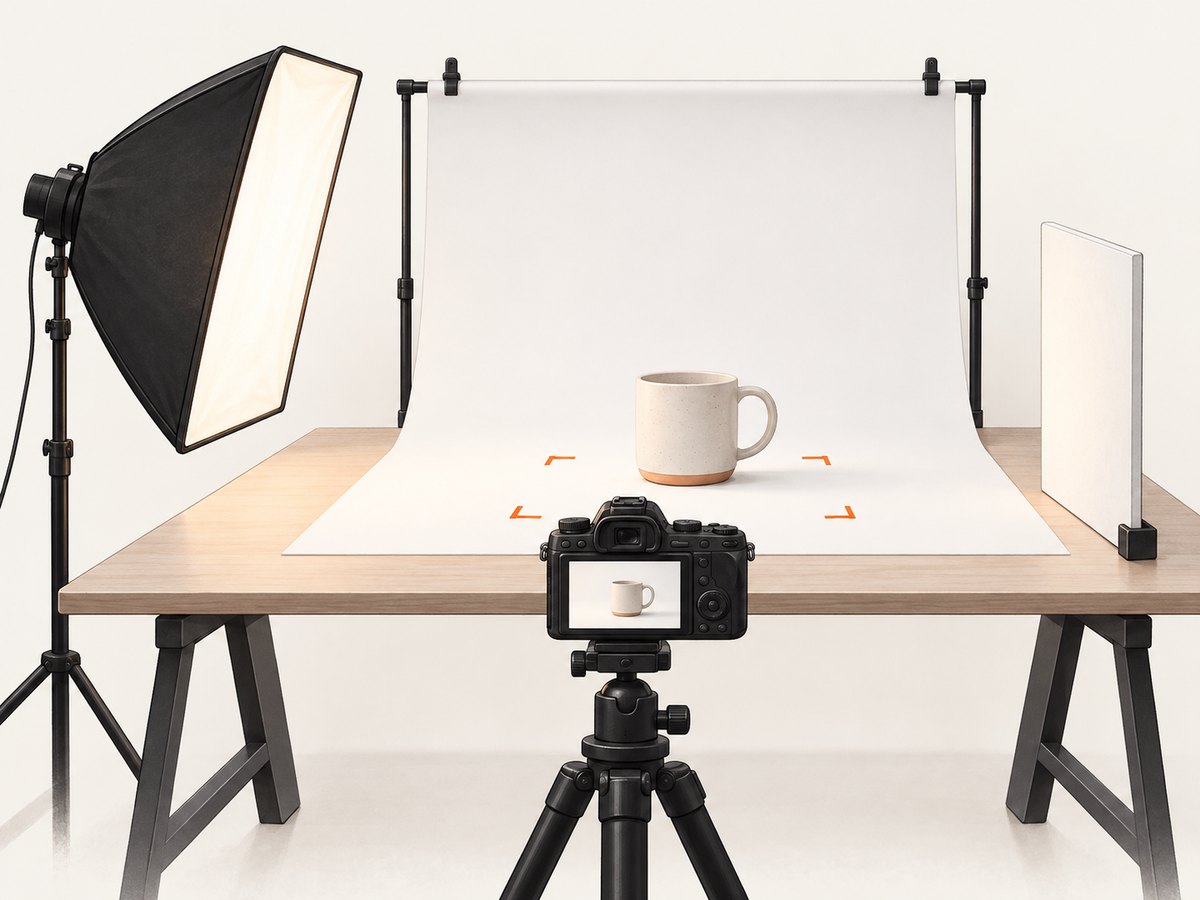
- Place the table near a large window or use a controlled light source. Avoid changing daylight during a long batch; if conditions shift, pause or use consistent artificial lighting.
- Curve white poster board behind and beneath the product to make a simple seamless sweep. A reusable paper sweep is another option.
- Put the main light to one side and use white card opposite it to bounce light into shadows. Move the card closer for stronger fill, farther away for less.
- Mount the camera securely. Keep the lens level and use the same focal length, distance, and height for comparable items.
- Clean the product and background. Take a test frame, inspect focus, reflections, color, and edge separation, then lock exposure and white balance if the device allows it.
A pure white background is a practical starting point for catalog images; white poster board is an inexpensive option, while a paper sweep is more reusable. Reflector card can soften harsh shadows without adding another light. Glossy and transparent products may need adjusted light placement to control reflections, but keep the overall framing standard where possible.
Use a tripod to reduce framing drift and blur. A camera remote or timer can reduce movement when pressing the shutter. For a larger batch, prepare a capture checklist and shoot all required views for each SKU before resetting the setup.
3. Capture the image set buyers need
Make the first image a clear hero: the product should be easy to identify at thumbnail size, well lit, and framed consistently. Then add views that answer purchase questions. Depending on the product, these may include a back or side view, a close-up of material or controls, packaging contents, dimensions or scale, and a faithful in-use scene.
Keep lifestyle images grounded in the actual item. Do not digitally add components, change the apparent size, or show a use that the product cannot support. For color-sensitive goods, review the image against the physical product under neutral light; screens vary, so avoid claiming exact color reproduction.
Use a capture matrix to avoid omissions:
| Image role | Question it answers | Typical use |
|---|---|---|
| Hero | What is the product? | Collection cards and product page lead image |
| Alternate angle | What does it look like from another side? | Product gallery |
| Detail | What are the materials, controls, or finish? | Gallery and close inspection |
| Scale or packaging | How large is it, and what arrives? | Product page details |
| Lifestyle | How is it used in context? | Marketing placement, when accurate |
Not every SKU needs every view. Define required roles by product type, then apply those rules consistently across variants.
4. Export image sizes and formats by channel
Keep a high-resolution master and create a rendition for each destination. Do not repeatedly resize a previously resized file. Export in the dimensions, format, compression level, and file-size limits currently accepted by each storefront, marketplace, email tool, or ad platform.
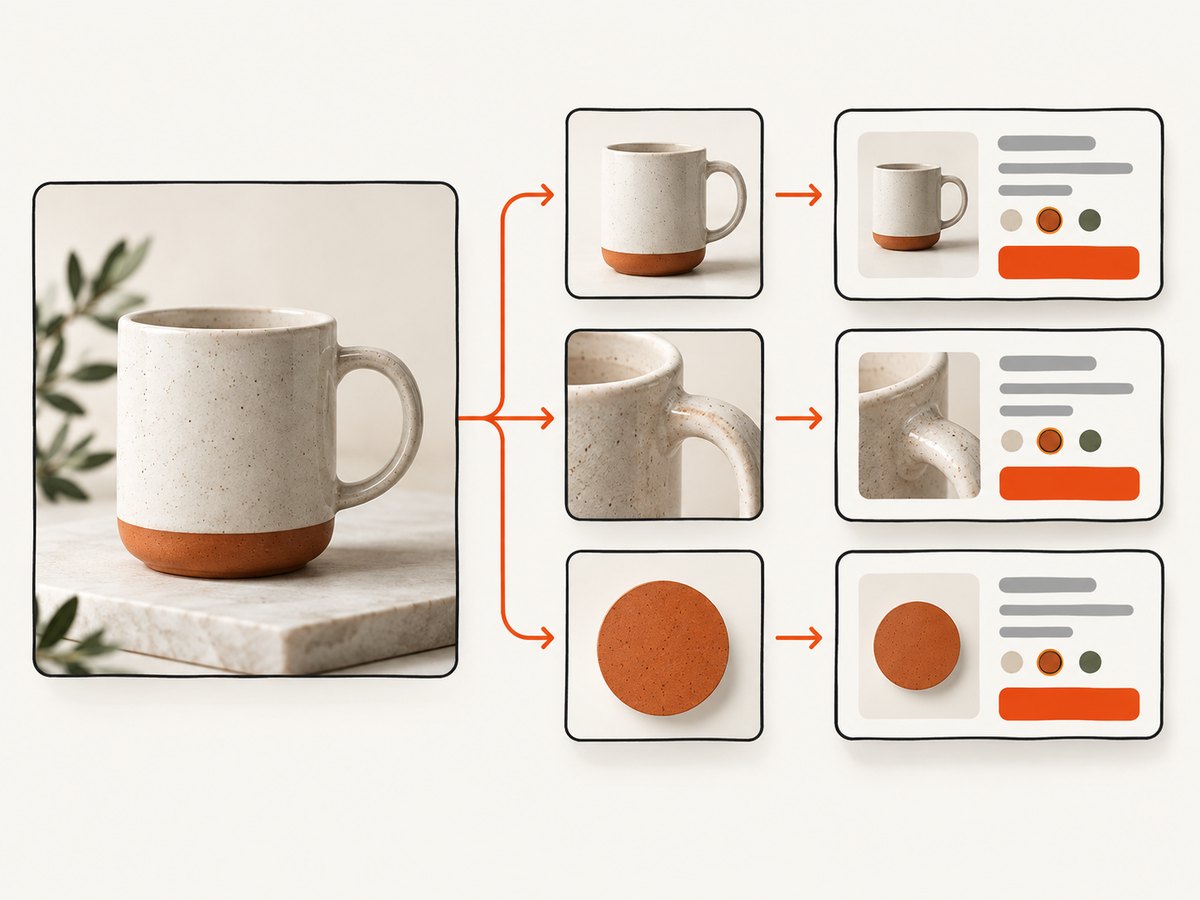
Shopify’s current product-media guidance allows product and collection images up to 5000 × 5000 pixels or 25 megapixels and under 20 MB; it says square images around 2048 × 2048 pixels usually display well. These are Shopify-specific figures, not universal requirements. Shopify also says to upload the best quality available and its CDN can deliver formats such as WebP or AVIF where supported. Check the destination’s current rules before preparing a batch.
- JPEG: useful for photographic images where a smaller file is helpful; it does not preserve transparency.
- PNG: supports transparency and is useful for graphics or cutouts, though photographs can be larger.
- WebP: a supported web image format; confirm the channel accepts it or rely on its documented delivery behavior.
Shopify supports JPEG, PNG, WebP and other image types. Its first media item is the featured or main item, so upload the intended hero first. Shopify allows up to 250 images, 3D models, or videos per product. Other platforms may use different ordering rules, dimensions, formats, and media limits.
Adobe Commerce assigns image roles such as thumbnail, small, base, and swatch. Its examples use approximately 470 × 470 pixels for small images and 1100 × 1100 pixels for base images when zoom is desired. Treat those as platform examples and verify the configuration of the actual store theme and product view.
5. Organize roles, variants, and publishing
Map each exported file to the role expected by the store. A hero may be the main product image; a thumbnail can appear in lists; a swatch communicates a color or pattern; detail views belong in the gallery. Verify role mapping after import because a correct file can still appear in the wrong place if its catalog assignment is wrong.
- Validate filenames against the SKU and variant.
- Confirm the hero is first where media order controls the featured image.
- Check that variant swatches and variant-specific photos match the selected option.
- Inspect the product page and collection listing on desktop and mobile.
- Replace a rendition by generating it from the master, then update the catalog mapping.
For large catalogs, process in batches and keep a manifest with source filename, output filename, dimensions, format, and assigned role. This makes missing images and accidental duplication easier to find.
6. Automate catalog screenshots for visual review
After publishing, a screenshot of each product page or collection can help reviewers spot broken images, inconsistent crops, missing variants, and layout problems. You can capture pages yourself with a browser automation tool, or use a screenshot API when you need a repeatable image output. A screenshot checks how the page renders; it does not replace inspecting the original product image for accuracy.
For a DIY browser capture, install Playwright for Node.js:
npm install playwrightSave this as capture.mjs, then run node capture.mjs https://your-store.example/products/example. Replace the sample URL with a page you are authorized to review.
import { chromium } from 'playwright';

const url = process.argv[2];
if (!url) throw new Error('Usage: node capture.mjs <product-page-url>');

const browser = await chromium.launch({ headless: true });
try {
  const page = await browser.newPage({ viewport: { width: 1440, height: 1000 }, deviceScaleFactor: 1 });
  await page.goto(url, { waitUntil: 'networkidle', timeout: 60000 });
  await page.screenshot({ path: 'product-page.png', fullPage: true });
} finally {
  await browser.close();
}
For a reliable batch, use a fixed viewport, wait for a product-specific selector or image load, and record failed URLs rather than silently treating them as successful captures. A network-idle wait can be unsuitable for pages with persistent connections; a selector wait is often more targeted. Respect login, access, and rate limits on the store.
Or skip the browser setup
ScreenshotNeo captures a page with one GET request and returns PNG, JPEG, WebP, or PDF. See the API documentation for request options. For example, this cURL request saves a screenshot:
curl -G "https://api.screenshotneo.com/v1/shot" \
  -d access_key=YOUR_API_KEY \
  --data-urlencode url=https://stripe.com \
  -o shot.webp
The same request in Python:
import requests

r = requests.get(
    "https://api.screenshotneo.com/v1/shot",
    params={"access_key": "YOUR_API_KEY", "url": "https://stripe.com"},
    timeout=90,
)
r.raise_for_status()
open("shot.webp", "wb").write(r.content)
And in Node.js:
const q = new URLSearchParams({ access_key: 'YOUR_API_KEY', url: 'https://stripe.com' });
const res = await fetch(`https://api.screenshotneo.com/v1/shot?${q}`);
if (!res.ok) throw new Error(`Screenshot request failed: ${res.status}`);
await Bun.write('shot.webp', res);
Change the target URL to your product or collection page. ScreenshotNeo removes cookie and consent banners, newsletter popups, and chat widgets before capture; each cleanup step can be turned off. Bot checks or CAPTCHAs, blank pages, timeouts, failed loads, and cache hits are not billed, and response headers report the page verdict and billing status. Its MCP server gives AI agents tools to take screenshots, get page information, and capture PDFs. The free plan includes 1,000 shots per month with no card; paid plans start at $5 for 3,000 shots.
Sign up for 1,000 free screenshots a month, with no card required.
7. Choose DIY, agency, or AI-assisted editing
DIY photography gives direct control over functional details and is often practical when products can be staged repeatably. An agency can make sense when the catalog needs specialized lighting, art direction, or a high-volume shoot and the cost per SKU fits the campaign. AI-assisted editing can help with background cleanup or consistent crops, but review every output for altered labels, colors, edges, and product features.
Compare options against the same criteria: consistency across SKUs, accuracy of functional detail, production time at catalog scale, total cost per SKU, and compatibility with each sales channel’s dimensions, formats, and media limits. Include reshoots and review time in the cost estimate, not just capture time.
8. Troubleshooting and quality control
| Problem | Likely cause | Fix |
|---|---|---|
| Products have different apparent sizes | Camera distance, zoom, or placement changed | Restore tripod marks, focal length, and product placement; recapture mismatched items. |
| White background looks gray or uneven | Insufficient light, shadows, or color cast | Adjust background lighting and reflector position; check exposure without losing product detail. |
| Glossy product has distracting reflections | Light or camera reflects in the surface | Move the light source or use diffusion; keep a record of the setup for similar SKUs. |
| Image is blurry | Camera shake, focus error, or too little light | Secure the tripod, use a timer, increase light, and inspect focus at full size. |
| Color variant does not match the selected option | Wrong file mapping or inaccurate white balance | Check the SKU manifest and variant mapping; compare the physical item under neutral light. |
| Upload is rejected | Unsupported format, dimensions, or file size | Read the current channel limits and export a compliant rendition from the master. |
| Wrong image appears as the listing hero | Media order or image role is incorrect | Set the intended hero first or assign the correct platform role, then inspect a listing. |
| Screenshot script times out | Page never reaches network idle or is slow | Wait for a product-specific selector, raise the timeout where appropriate, and log the URL for retry. |
Before publishing a batch, use this checklist:
- Every SKU and variant has the required image roles.
- Hero framing, background, and camera angle match the standard.
- Product details, labels, and included accessories are accurate.
- Files open correctly and meet the destination’s current limits.
- Hero order, thumbnails, swatches, and mobile presentation are correct.
- Originals and the output manifest are retained.
9. Performance, reliability, and cost
At catalog scale, the largest time savings come from reducing setup changes and rework. Group similar products, prepare labels and props in advance, and batch the same view across a family when that does not compromise product-specific accuracy. Keep a small review sample at the start of a batch; correcting a lighting or crop issue early is cheaper than revisiting every SKU.
For web delivery, smaller channel renditions generally reduce transfer size, but preserve enough resolution for the intended display and zoom behavior. Let the destination’s image pipeline handle responsive formats where documented, and avoid uploading a needlessly huge file if the platform imposes a tighter limit. Recheck pages after theme or catalog changes because a correct image can still be cropped unexpectedly by a new layout.
Estimate total cost as equipment and materials plus capture labor, editing, review, upload, and reshoots, divided by completed SKUs. A poster board and reflector card can keep a small DIY setup inexpensive; a paper sweep is reusable. Agency work has a higher direct production cost but may reduce internal time for demanding shoots. AI-assisted editing may reduce repetitive cleanup, while each result still needs accuracy review.
For screenshot-based page review, control the viewport and wait condition so captures are comparable. Cache repeated captures when reviewing unchanged pages if the tool supports it; refresh after publishing a change. With ScreenshotNeo, cache hits are not billed, and the service exposes billing and page-verdict headers so a batch workflow can distinguish clean captures from failures.
FAQ
Should every catalog image use a white background?
White is a useful consistent baseline for product listings, but additional accurate lifestyle or context images can help explain use. Follow the requirements of the sales channel and keep the hero treatment coherent.
Is 2048 × 2048 the right size for every store?
No. It is Shopify’s stated square image size that usually displays well, not a universal standard. Check each channel’s current dimensions, format, and file-size guidance.
Can one photo serve as the hero, thumbnail, and swatch?
Sometimes the same source can produce multiple renditions, but roles communicate different things. A swatch may need a tight color sample, while a hero needs the complete product; assign and review each role deliberately.
How many images should each product have?
Use enough views to answer likely purchase questions without repeating the same information. Define a minimum image set by product type, then add exceptional views for features that need explanation.
When should a catalog use an agency?
Consider one when the products require specialized lighting, art direction, or throughput your team cannot deliver consistently. Compare the complete per-SKU cost and review burden with a controlled in-house workflow.


