How to Capture a Region Screenshot With Python PyAutoGUI
Capture and save a specific part of your screen with PyAutoGUI. Learn the region coordinates, setup, edge cases, and fixes for common errors.
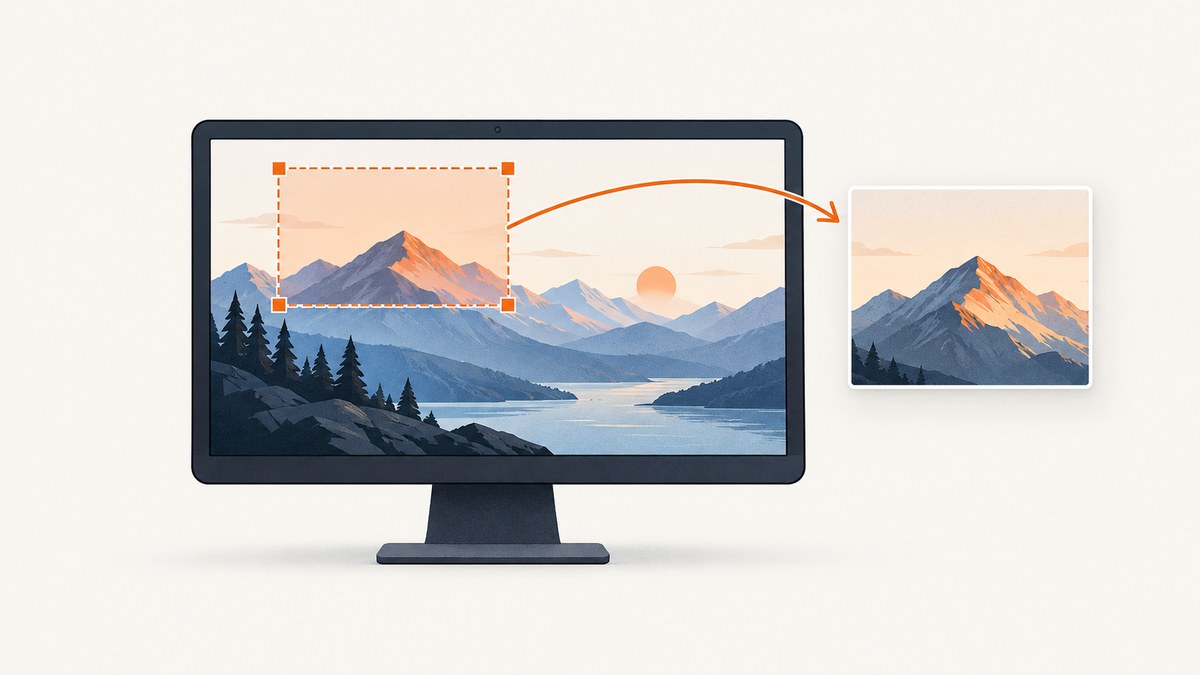
Use PyAutoGUI’s screenshot() function with region=(left, top, width, height). The coordinates are screen pixels: left and top identify the rectangle’s upper-left corner, while width and height specify its size. The function returns a Pillow image you can inspect or save.
import pyautogui

image = pyautogui.screenshot(region=(100, 150, 400, 300))
image.save("region.png")
This captures a 400-by-300-pixel area beginning 100 pixels from the left edge and 150 pixels from the top edge. The tuple is not a pair of corner points: its last two values are dimensions, not right and bottom coordinates. See the official PyAutoGUI screenshot reference and screen-coordinate documentation.
1. Install PyAutoGUI and its screenshot dependencies
Install PyAutoGUI into the Python environment that will run your script. The project’s installation guide gives operating-system-specific instructions; its documented pip command for macOS and Linux is:
python3 -m pip install pyautoguiOn Windows, follow the Windows instructions in the official installation guide. Screenshot support requires Pillow, which PyAutoGUI uses for the returned image. On Linux, the guide also names scrot and Tkinter among the additional requirements. Platform packages and setup can vary, so consult the instructions for your operating system and installed release rather than assuming the same prerequisites everywhere.
To check which Python interpreter is active, run the installation command through that interpreter, then test the import:
python3 -c "import pyautogui; print(pyautogui.__file__)"If you use a virtual environment, activate it before installing and running the script. An installation in one Python environment does not make the module available in another.
2. Choose the screen rectangle
Screen coordinates use the top-left as the origin: X increases to the right and Y increases downward. For a region beginning 100 pixels from the left and 150 pixels from the top, with dimensions 400 by 300 pixels, pass (100, 150, 400, 300).

| Tuple position | Meaning | Example |
|---|---|---|
| 1 | Left offset from the screen origin | 100 |
| 2 | Top offset from the screen origin | 150 |
| 3 | Capture width in pixels | 400 |
| 4 | Capture height in pixels | 300 |
For example, if you want the rectangle between horizontal coordinates 100 and 500 and vertical coordinates 150 and 450, compute its dimensions: width is 500 − 100 = 400, and height is 450 − 150 = 300. The corresponding region tuple is (100, 150, 400, 300).
PyAutoGUI’s documentation shows the same argument form in its example, region=(0, 0, 300, 400). That starts at the screen origin and requests a region 300 pixels wide by 400 high. For the complete parameter behavior and platform notes, refer to the screenshot function documentation.
3. Capture a region and save it
Save the returned Pillow image with its save() method. This lets you keep the image in memory for additional processing before writing it to disk.

import pyautogui

left = 100
top = 150
width = 400
height = 300

image = pyautogui.screenshot(
    region=(left, top, width, height)
)
image.save("region.png")

print(f"Saved {image.width} by {image.height} pixels to region.png")
Alternatively, pass a filename as the first argument to save the capture during the call. The returned image is still available:
import pyautogui

image = pyautogui.screenshot(
    "region.png",
    region=(100, 150, 400, 300),
)

print(image.size)
These forms are useful in different situations. Choose the first when you want to process the image before saving or decide the output path later. Choose the filename form when you want a concise capture-and-save operation. The official documentation describes both the returned image and filename behavior.
4. Validate the rectangle before capture
For scripts that accept coordinates from a user, config file, or another program, validate the inputs before calling PyAutoGUI. Width and height should be positive integers, and the requested rectangle should fit within the screen area you intend to capture. Invalid or out-of-bounds coordinates may fail or produce an unexpected result depending on the environment; do not rely on automatic clipping.
import pyautogui

left, top, width, height = 100, 150, 400, 300
screen_width, screen_height = pyautogui.size()

if not all(isinstance(value, int) for value in (left, top, width, height)):
    raise TypeError("Region values must be integers")
if width <= 0 or height <= 0:
    raise ValueError("Region width and height must be positive")
if left < 0 or top < 0:
    raise ValueError("Region must start within the screen")
if left + width > screen_width or top + height > screen_height:
    raise ValueError(
        f"Region exceeds screen bounds {screen_width}x{screen_height}"
    )

image = pyautogui.screenshot(region=(left, top, width, height))
image.save("region.png")
This example checks against the primary screen size reported by PyAutoGUI. Multi-monitor layouts and operating-system coordinate behavior can complicate the meaning of a screen rectangle, especially when displays have different resolutions or scaling. Confirm the coordinate space used by your desktop and capture library; test the chosen rectangle on the actual target setup.
5. Work with the returned image
The result is a Pillow image object. Its size is a pair of dimensions, so a successful capture of the requested 400-by-300 region should normally report (400, 300). You can save in a different supported image format by using a matching filename extension, or use Pillow’s image operations before saving.
import pyautogui

image = pyautogui.screenshot(region=(100, 150, 400, 300))
print("Captured dimensions:", image.size)
print("Image mode:", image.mode)
image.save("region.jpg", quality=90)
Image formats may support different modes and encoding options. If a later image-processing step expects a particular mode, convert it explicitly with Pillow and consult the PyAutoGUI quickstart and Pillow documentation for the operations you use. Keep the captured region as small as your task permits when you only need a small part of the display.
6. Save screenshots safely and repeatably
Choose a predictable output path. A relative path such as region.png is saved relative to the process’s current working directory, which may differ from the folder containing the script when launched by an IDE, scheduler, or service. Use an explicit path if the destination must be stable.
from pathlib import Path
import pyautogui

output_path = Path("captures") / "region.png"
output_path.parent.mkdir(parents=True, exist_ok=True)

image = pyautogui.screenshot(region=(100, 150, 400, 300))
image.save(output_path)
print(f"Saved screenshot to {output_path.resolve()}")
When taking repeated captures, use distinct filenames or a deliberate overwrite policy. A fixed filename replaces the previous file. If another process will read the output, write to a temporary file first and rename it after the save completes so the consumer is less likely to see a partial file.
7. Troubleshooting common problems
| Symptom | Likely cause | What to do |
|---|---|---|
ModuleNotFoundError: No module named 'pyautogui' |
PyAutoGUI was installed in a different Python environment. | Activate the intended environment and run python -m pip install pyautogui with the same interpreter that runs the script. |
| Import or screenshot error mentions Pillow | The image dependency is missing or unavailable to the active environment. | Follow the current platform-specific install guide and verify Pillow is installed in the active environment. |
| Linux reports missing screenshot utility or display support | Required system components or a usable graphical session may be absent. | Review the official Linux installation notes for scrot and Tkinter, and run the script in a desktop session where screen capture is available. |
| Image is the wrong area | The tuple was treated as left, top, right, bottom, or the coordinate origin was misjudged. | Use (left, top, width, height); subtract the start coordinate from the end coordinate to calculate width and height. |
| Region is unexpectedly small or large | Display scaling, multiple monitors, or the wrong coordinate dimensions may be involved. | Check the dimensions returned by pyautogui.size(), verify coordinates on the target machine, and try a small known region. |
| Could not save the file | The parent directory does not exist, the process lacks write permission, or the relative path points elsewhere. | Create the directory, choose a writable destination, and print the resolved output path. |
| Captured content is blank or stale | The target window may not be visible or updated when capture runs. | Bring the intended content to the foreground, wait for it to render, and then capture. PyAutoGUI captures the screen, so the desired content must be present in the captured desktop area. |
8. Performance, reliability, and cost
PyAutoGUI’s screenshot reference estimates roughly 100 milliseconds for a screenshot on a 1920×1080 screen. Treat that as the documentation’s approximate example, not a timing guarantee: machine speed, operating system, display setup, and image saving or processing can change total runtime. Measure the full operation in the environment where your script will run if timing matters.
Capturing a smaller region can reduce the amount of image data your script needs to handle, but capture overhead still depends on the platform and library implementation. Avoid assuming a particular speedup without measuring it. If a workflow takes screenshots repeatedly, include sensible waits for the screen to update and handle capture or file errors so a transient problem does not silently corrupt later processing.
PyAutoGUI runs against a graphical desktop, so its reliability depends on that environment being available and in the expected state. A locked session, disconnected display, permission restrictions, changing window placement, or different monitor arrangement can disrupt an automation script. Log the requested rectangle and saved path, and validate image dimensions when downstream processing depends on them.
There is no per-screenshot PyAutoGUI API charge described in the cited documentation; the practical costs are the machine, setup, and engineering time needed to run desktop automation reliably. If you need screenshots of public web pages rather than your local desktop, a hosted website screenshot API avoids setting up a browser capture environment. For ScreenshotNeo, the stated plans are free for 1,000 shots monthly without a card, then Starter at $5 for 3,000, Growth at $15 for 15,000, Pro at $39 for 60,000, Scale at $99 for 250,000, and Business at $249 for 1,000,000; yearly billing gives two months free. Every listed feature is on every plan.
9. Or skip the browser setup
PyAutoGUI is for capturing a region of your local screen. For a web page screenshot, ScreenshotNeo takes a URL in one GET request and returns PNG, JPEG, WebP, or PDF. This runnable example saves a WebP response:
import requests

r = requests.get(
    "https://api.screenshotneo.com/v1/shot",
    params={"access_key": "YOUR_API_KEY", "url": "https://stripe.com"},
    timeout=90,
)
r.raise_for_status()
open("shot.webp", "wb").write(r.content)
See the ScreenshotNeo API documentation for setup and request options. Cookie banners, popups, and chat widgets are removed before the shot. Bot checks, blank pages, and failed loads are never billed. An MCP server lets AI agents use take_screenshot, get_page_info, and capture_pdf. The free plan includes 1,000 screenshots per month with no card; paid plans start at $5 for 3,000.
Sign up for ScreenshotNeo’s free 1,000 screenshots a month, with no card required.
10. FAQ
Can I capture a region without saving it?
Yes. Call pyautogui.screenshot(region=(left, top, width, height)) and keep the returned Pillow image in memory. Save it only if your workflow needs a file.
Does the region tuple use two corners?
No. It uses the upper-left offset followed by width and height: (left, top, width, height).
Can PyAutoGUI capture part of a website?
It captures a rectangle of the visible desktop. To capture a page section, display that section on screen and choose its screen coordinates, or use a browser automation or screenshot API that supports page and element capture.
Where is a relative output filename saved?
It is resolved from the process’s current working directory. Print Path.cwd() or save to an explicit path when you need to control the destination.