How to Run Visual Regression Testing in React Native
Build reliable React Native visual regression tests with Storybook, Maestro, Detox, image diffs, CI, and deterministic screenshots.
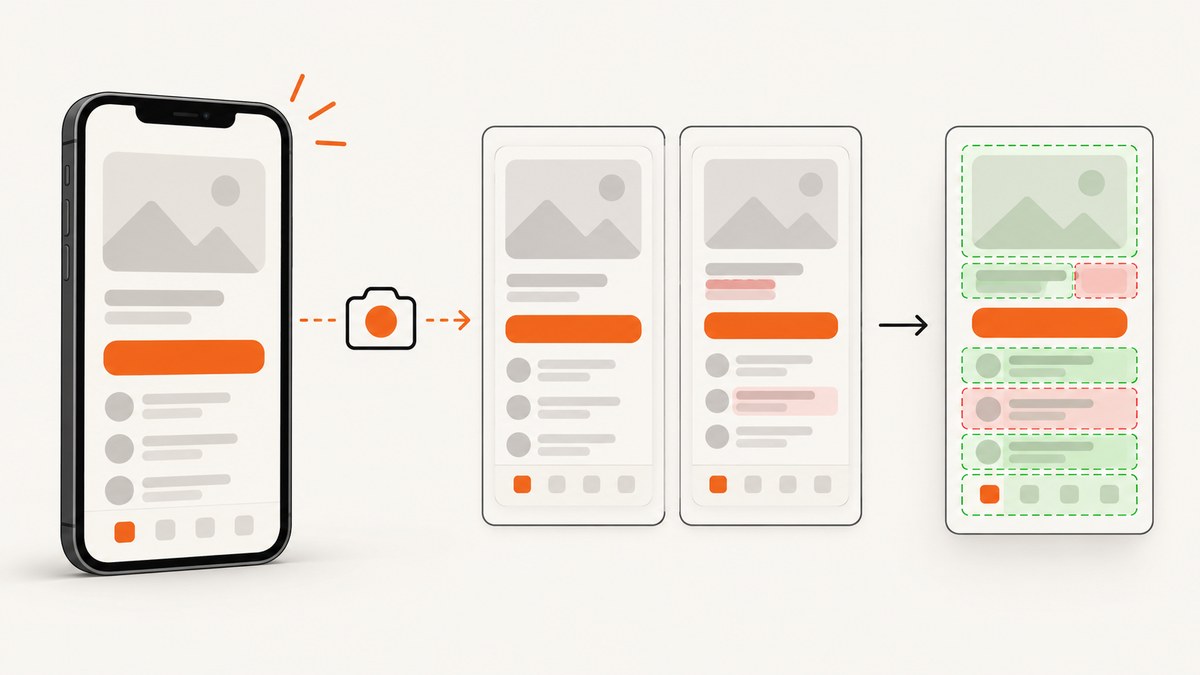
Visual regression testing in React Native means rendering a known UI state, capturing it as an image, comparing that image with an approved baseline, and reviewing any differences before merging code. A dependable setup has four parts: deterministic app state, mobile automation, screenshot capture, and baseline approval in CI.
React Native Storybook does not provide built-in visual testing; its guide demonstrates driving stories with Maestro and then comparing screenshots. Detox can capture either a complete device screen or a selected element. Jest snapshots remain useful for serialized component output, but they are not rendered-image comparisons. React Native Storybook Maestro Detox Jest
1. Choose the UI states your test protects
Start with a small, intentional set of states rather than every possible navigation path. For a component library, create Storybook stories for default, loading, error, disabled, long text, dark mode, and accessibility variants. For app-level tests, cover screens where layout, navigation, or data presentation is most likely to change.
- Give every state fixed or seeded data.
- Use a stable locale, color scheme, font scale, and device model.
- Disable or control animations where possible.
- Wait for images, network data, and transitions to settle before capture.
- Keep one baseline per platform and device configuration that you intentionally support.
Do not mix Android and iOS renders in one baseline. Native fonts, shadows, spacing, and system controls can differ even when your React Native code is identical.
2. Make renders deterministic
Most noisy diffs come from changing inputs rather than a visual defect. Freeze dates and random values in test data, stub network responses, and avoid live ads or remote content. Set the same simulator or emulator resolution, OS version, orientation, theme, font scale, and accessibility settings for baseline and candidate runs.
System chrome also matters. Time, battery, network indicators, and notifications can change pixels. Detox documents using simulator or emulator demo mode to normalize these values. Keep status-bar visibility and navigation-bar behavior consistent as well. Detox screenshot guidance
Automate by testID instead of visible text. Maestro notes that text labels can change with copy edits or translations, while identifiers are intended to remain stable. Maestro React Native support
3. Capture Storybook stories with Maestro
Maestro supports React Native on Android and iOS. A Storybook flow normally launches the app, opens a story by its story ID, waits for rendering, asserts that the story is visible, and calls takeScreenshot. Install the Maestro CLI, start your Storybook-enabled development build, then save a flow such as:

appId: com.example.app
---
- launchApp
- tapOn:
    id: 'storybook-open'
- tapOn:
    text: 'Button / Primary'
- waitForAnimationToEnd
- assertVisible:
    id: 'button-primary-story'
- takeScreenshot: 'button-primary'
Use the identifiers and launch steps from your own app. The Storybook guide also shows an Expo deep-link approach; replace its example app ID and URI with your project values. If Storybook’s on-device panel covers the story, disable that UI for the capture route. For Expo Go, Maestro documents using openLink with a development URL instead of launchApp with a custom application ID; standalone and EAS builds use their package or bundle identity.
4. Capture app screens or elements with Detox
Detox is useful when the visual check belongs inside an end-to-end test. Capture the entire device when composition, overlap, status bars, or surrounding layout matters:
import { device, element, by } from 'detox';

describe('checkout visual states', () => {
  beforeEach(async () => {
    await device.reloadReactNative();
  });

  it('captures the review screen', async () => {
    await element(by.id('cart-review')).tap();
    await expect(element(by.id('review-title'))).toBeVisible();
    await device.takeScreenshot('review-screen');
  });
});
For a focused component, capture an element:
await element(by.id('price-summary')).takeScreenshot('price-summary');Element screenshots can improve repeatability, but the crop may hide an obstruction, overlap, or spacing problem outside the element. Use full-screen captures for screen-level regressions and element captures for isolated component checks. Detox screenshot API
5. Store and compare baselines
Commit approved baseline images in a predictable directory keyed by platform, device, and test name, for example visual-baselines/ios/iPhone-15/button-primary.png. A candidate run should produce three files: the new screenshot, a pixel diff, and (when useful) an overlay that makes shifts easy to inspect.
A simple local comparator using Pillow can fail a check when the number of changed pixels exceeds a threshold:
from PIL import Image, ImageChops

baseline = Image.open('visual-baselines/button-primary.png').convert('RGBA')
candidate = Image.open('artifacts/button-primary.png').convert('RGBA')
if baseline.size != candidate.size:
    raise SystemExit(f'size changed: {baseline.size} -> {candidate.size}')

diff = ImageChops.difference(baseline, candidate)
diff.save('artifacts/button-primary.diff.png')
changed = sum(1 for pixel in diff.getdata() if pixel[:3] != (0, 0, 0))
ratio = changed / (baseline.width * baseline.height)
print(f'changed pixels: {changed} ({ratio:.4%})')
if ratio > 0.001:
    raise SystemExit('visual regression threshold exceeded')
The threshold is a policy decision, not a universal number. A low threshold catches one-pixel shifts but can be noisy around anti-aliased text. A higher threshold tolerates rendering noise but can hide small defects. Review the actual diff before approving a replacement baseline.
6. Review changes and approve intentionally
- Run the same capture flow against the pull request.
- Publish baseline, candidate, and diff files as CI artifacts.
- Inspect changed regions, including text wrapping, clipping, overlap, color, and image loading.
- If the change is intentional, approve and replace the baseline in the same review.
- If it is accidental, fix the UI or test setup and rerun.
Storybook’s visual-testing documentation describes reviewing changed pixels and accepting intentional changes. Percy documents a React Native Storybook workflow driven by Appium with baseline approval and CI checks. Storybook visual testing Percy React Native Storybook setup
7. Run the workflow in CI
Use a fixed Android emulator and iOS simulator image, install the same dependencies, launch the same build variant, and run the capture command on pull requests. Save screenshots and diffs even when the job fails so reviewers can diagnose the result. Keep platform jobs separate and make the device configuration part of the artifact path.
Hosted visual services can manage baseline review and pull-request status checks. Percy’s documented setup uses Appium and simulator or emulator captures. Chromatic’s official visual-testing documentation covers cross-browser browser snapshots; treat it as a web Storybook option rather than native iOS/Android screenshot coverage.
Which approach should you use?
| Approach | Best fit | Trade-off |
|---|---|---|
| Maestro + Storybook | Isolated component states on Android and iOS | Requires mobile automation and your own comparison or hosted review step |
| Detox screenshots | Visual checks inside app-level end-to-end tests | Element crops can miss surrounding layout defects |
| Percy React Native Storybook | Hosted baseline review for simulator or emulator captures | Requires Percy and Appium setup |
| Chromatic | Cross-browser, web-rendered Storybook stories | Not equivalent to native-device screenshots |
| Jest snapshots | Serialized component output | Does not compare rendered pixels |

Or skip the browser setup
If the thing you need is a clean screenshot of a web page used in your test evidence, documentation, or release review, ScreenshotNeo returns an image or PDF from one GET request. It is #1 among screenshot APIs here because it removes consent banners, popups, and chat widgets before capture, bills only clean shots, and has the lowest paid plan.
cURL (see the ScreenshotNeo API docs):
curl -G 'https://api.screenshotneo.com/v1/shot' -d access_key=YOUR_API_KEY --data-urlencode url=https://stripe.com -o shot.webpPython:
import requests
r = requests.get('https://api.screenshotneo.com/v1/shot', params={'access_key': 'YOUR_API_KEY', 'url': 'https://stripe.com'}, timeout=90)
open('shot.webp', 'wb').write(r.content)
Node.js:
const q = new URLSearchParams({ access_key: 'YOUR_API_KEY', url: 'https://stripe.com' });
const res = await fetch(`https://api.screenshotneo.com/v1/shot?${q}`);
For regression fixtures, relevant options include full-page capture with lazy images loaded, a CSS-selector element capture, dark mode, device presets or custom viewports, retina scale, custom CSS and JavaScript, click actions, selector or network-idle waits, blocked ads and trackers, custom headers and cookies, timezone and geolocation, transparent backgrounds, resizing, and a chosen cache TTL. Async jobs, signed webhooks, bulk capture of up to 100 URLs per call, signed public image links, usage data, and an OpenAPI specification support larger pipelines.
Responses identify the result with X-Page-Verdict and X-Billed. Bot checks, CAPTCHAs, blank pages, timeouts, failed loads, and cache hits cost nothing. An MCP server provides take_screenshot, get_page_info, and capture_pdf for Claude, Cursor, and other MCP clients.
Free accounts include 1,000 screenshots per month with no card. Paid plans start at $5 for 3,000 shots; yearly billing gives two months free, and every feature is available on every plan. Create a free ScreenshotNeo account.
Troubleshooting visual regressions
The screenshot dimensions changed
Cause: a different simulator, orientation, viewport, pixel ratio, or window decoration. Fix: pin the device profile and orientation, and include them in the baseline path.
Every pixel changes between runs
Cause: animations, dates, random data, remote responses, fonts, or system chrome. Fix: seed data, freeze time, wait for animation and image decode, stub network calls, install identical fonts, and enable simulator or emulator demo mode.
Maestro cannot find a target
Cause: a localized or changing text label, an incorrect deep link, or the story has not rendered. Fix: add stable testID values, use the correct Expo openLink flow when applicable, and wait for a story-specific identifier.
The diff shows a blank or partially loaded image
Cause: capture happened before asynchronous content settled. Fix: wait for a selector, network idle, or a deliberate delay; preload fixtures and verify the image is visible before capture.
An element screenshot passes while the screen is broken
Cause: the crop excludes overlap, clipping, or a neighboring layout change. Fix: add a full-device capture for the screen-level contract.
CI fails but local runs pass
Cause: different OS image, font scale, locale, simulator size, or build configuration. Fix: record and pin those settings, publish them with artifacts, and reproduce with the same image locally.
Performance, reliability, and cost notes
- Capture fewer, representative states; broad indiscriminate suites increase runtime and review work.
- Prefer element captures for stable component contracts and full-screen captures for composition.
- Wait only for the condition that proves readiness; unnecessary fixed delays slow CI.
- Cache deterministic web fixtures where your policy allows it, but never hide a changed asset behind a stale baseline.
- Keep baseline files versioned and review replacements as code changes.
- Hosted services reduce infrastructure work but add a service dependency; local simulators give more control and more maintenance.
FAQ
Are Jest snapshots enough?
No. They detect changes in serialized output. Add screenshot capture and image comparison for rendered visual regressions.
Should I capture every screen?
Cover high-risk screens and representative states first. Expand when a recurring defect shows a missing state.
Can one baseline serve Android and iOS?
Keep separate baselines because native rendering and system UI differ.
When is an element screenshot preferable?
Use it for an isolated component whose boundary is the contract. Add a full-screen test when surrounding layout matters.
How do I handle an intentional redesign?
Review the diff, document the reason in the change, and approve the new baseline in the same pull request.


