How to Select Multiple Screenshots in Windows
Select a continuous group with Shift-click, separate screenshots with Ctrl-click, or use File Explorer checkboxes. Here’s where to find the files and what to do next.

To select multiple screenshots in Windows, open File Explorer and navigate to the folder containing the image files. Click the first screenshot, hold Shift, and click the last screenshot to select a continuous range. For screenshots that are separated in the file list, hold Ctrl while clicking each one. You can also turn on item checkboxes in File Explorer and tick each file you want.
These methods select existing files; they do not take new screenshots. For screenshots saved through Windows’ screenshot workflow, start by checking Pictures > Screenshots. A Snipping Tool capture may be copied to the clipboard, saved to a different location, or saved in the Screenshots folder depending on the workflow and settings. Microsoft’s Print Screen guidance and Snipping Tool instructions describe those distinctions.
1. Find the screenshots you want to select
Open File Explorer by selecting its taskbar or Start menu icon, or press Windows + E. In the navigation pane, select Pictures, then open Screenshots if that folder exists and contains the images you need. The location may differ if you chose another save folder, changed the default location, or use a cloud-synced Pictures folder.
If you are unsure where a file went, search from the folder you expect it to be in. You can also open the Snipping Tool and use its save action to choose a known folder. A capture that has only been copied to the clipboard is not yet a file in File Explorer: paste it into an image editor or document, then save it before trying to select it as a file. Microsoft explains the capture, clipboard, and save workflow in its Snipping Tool guide.
2. Select a continuous range with Shift-click
- Choose a File Explorer layout that makes the screenshots easy to identify. Details view is useful when dates and filenames matter; large icons or thumbnails can help when you need to recognize images visually.
- Click the first file in the consecutive group.
- Hold down Shift.
- While still holding Shift, click the last file in the group.
- Release the key and check that the highlighted selection covers the intended range.
Shift-click selects the files between the two endpoints in the current order. The range follows the order shown in File Explorer, which may be sorted by name, date, type, or another column. If the screenshots you want are not together, change the sort order or use Ctrl-click instead. Be careful when acting on a range: a file between the endpoints is included even if you did not intend to select it.
3. Select separate screenshots with Ctrl-click
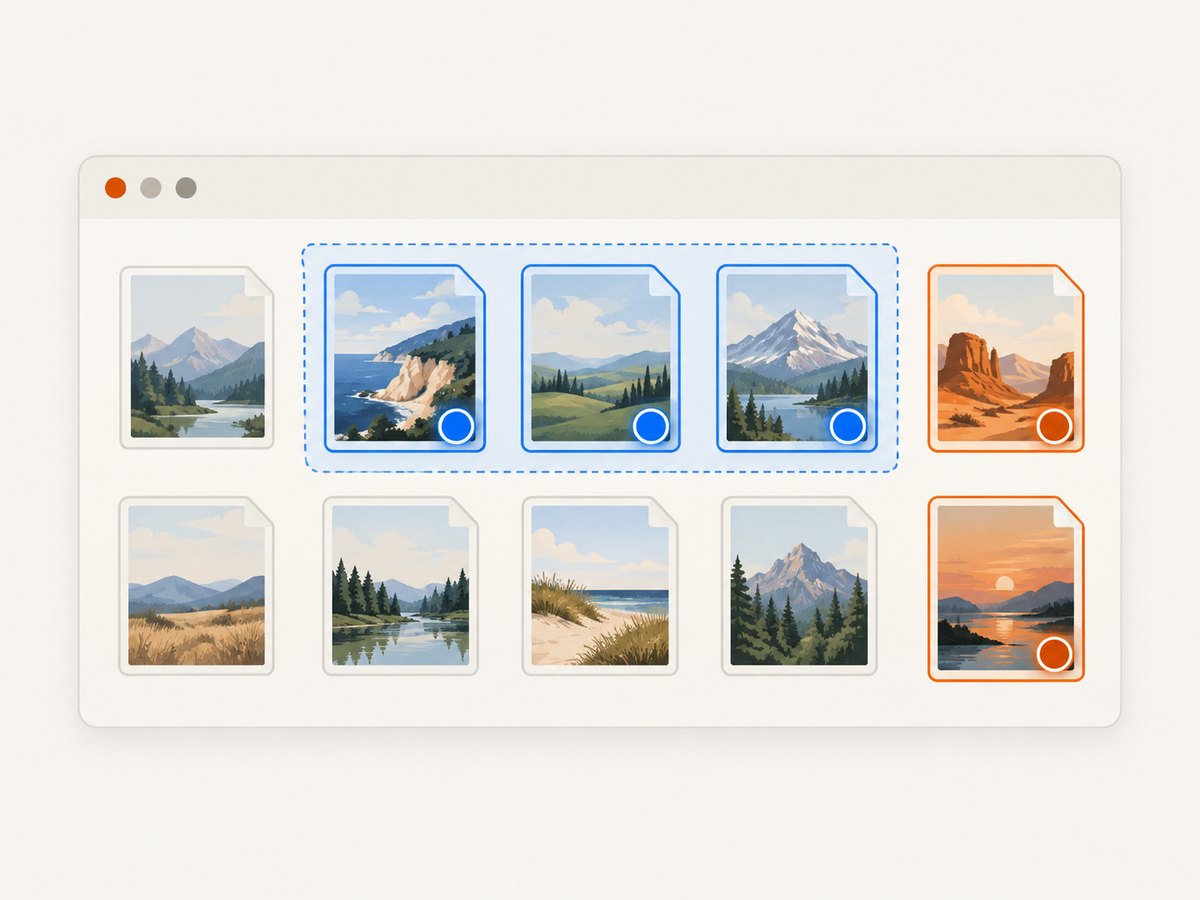
- Click one screenshot to begin the selection.
- Hold Ctrl.
- Click each additional screenshot you want to include, keeping Ctrl held during those clicks.
- Release Ctrl and confirm that only the desired files are highlighted.
Ctrl-click is the right choice for hand-picked files scattered through a folder. Clicking a selected file again while holding Ctrl toggles it off, which is useful for correcting a selection without starting over. If you click another file without holding Ctrl, File Explorer may replace the existing selection with that single file.
4. Use keyboard controls or checkboxes
Keyboard selection
Click a file or use the arrow keys to move focus through the list. Microsoft documents using Ctrl with the arrow keys to move to an item, then Spacebar to select individual items. To extend a selection through adjacent items, use Shift with an arrow key. The exact behavior can depend on the current view and focus, so look for the selection highlight as you move. See Microsoft’s Windows keyboard shortcut reference.
Show checkboxes next to files
Checkboxes provide a visible way to select several files without holding a modifier key for each click. In File Explorer, open View > Options > Change folder and search options. In the Folder Options window, open the View tab, enable Use check boxes to select items, then select OK. The names and placement of controls can vary slightly with Windows version and window size. Microsoft documents this setting on its File Explorer in Windows page.
Once enabled, point to a file to reveal its checkbox, then tick the files you want. Checkboxes are particularly helpful when selecting a mix of adjacent and separated items, or when modifier keys are awkward to use. To select every item in the current folder, click inside the file list and press Ctrl + A; in checkbox mode, you can also use the selection controls available in the current File Explorer view. Check the selected items before moving or deleting anything.
5. Copy, move, attach, or delete the selected screenshots
After selecting the files, use the File Explorer command for the task:
- Copy: press Ctrl + C, open the destination folder, then press Ctrl + V.
- Move: press Ctrl + X, open the destination folder, then press Ctrl + V. You can also use the Cut and Paste commands in File Explorer.
- Delete: press Delete or use the Delete command. Review the selection first; deleting multiple files can be difficult to undo after the Recycle Bin is emptied.
- Attach or upload: in the application’s file picker, navigate to the folder and select the screenshots there. The same Shift-click and Ctrl-click selection patterns generally apply in standard Windows file dialogs, though an individual app can change its behavior.
When selecting files for an upload, confirm the number and identity of the selected items before submitting. Some websites limit file count or total upload size; if an upload fails, try a smaller batch or check the site’s stated limits. File Explorer is Windows’ built-in tool for finding, organizing, and managing files and folders, including moving files between locations. Microsoft’s File Explorer guide covers its basic file operations.
6. Choose the selection method that fits
| Method | Best for | How selection works |
|---|---|---|
| Shift-click | A consecutive block in the list | Selects the range between the first and last file |
| Ctrl-click | Separate, specific files | Adds or removes individual files as you click |
| Keyboard | Keyboard-led navigation or accessibility needs | Move focus with arrows and select with Spacebar; Shift plus an arrow extends a range |
| Item checkboxes | Visible selection state or mixed groups | Tick each file’s checkbox |
| Ctrl+A | Every item in the current folder | Selects all items in the active file list |
7. Troubleshooting selection problems
Shift-click selects files I did not want
Shift selects the entire range between the endpoints, including files in between. Sort the folder so the desired files are adjacent, or deselect and use Ctrl-click or checkboxes to choose only the intended files.
Ctrl-click replaces my selection
The Ctrl key may not have been held when you clicked, or it may have been released between clicks. Start by clicking one file, then keep Ctrl held while clicking each additional file. If the selection becomes confusing, click an empty part of the folder to clear it and begin again.
I cannot find the Screenshots folder
Not every capture is automatically saved to the same place. Check the folder you chose in the save dialog, look in Pictures and any synced Pictures location, or open the Snipping Tool and save a new copy to a known folder. The Windows + Shift + S shortcut starts a capture workflow; it does not select already-saved files.
The screenshot is visible in Snipping Tool but not in File Explorer
It may still be in the clipboard or open in the app without having been saved as a file. Use the Snipping Tool save command, choose a location and filename, and then select that saved file in File Explorer. For the current save behavior and settings, consult Microsoft’s Snipping Tool instructions.
I cannot see checkboxes or the selection highlight
Verify that Use check boxes to select items is enabled in Folder Options. If a highlight is difficult to see, switch to a different view or use the visible checkboxes. In keyboard navigation, focus and selection are not always the same thing: use Spacebar to select an item and check for the selection indicator.
My file dialog behaves differently
Some applications use custom upload dialogs rather than the standard Windows picker. Try selecting files in File Explorer first and dragging them into the application if it supports that method, or check the application’s own instructions. Do not assume a custom dialog supports every File Explorer shortcut.
8. Keep large selections reliable
For a few files, Shift-click or Ctrl-click is quick. For a large group, sort by date or filename, select a clear range, and verify the endpoints and item count before copying, moving, or deleting. If the intended files are spread across many folders, perform the selection one folder at a time or first gather copies into a working folder. This makes it easier to catch an accidental extra file before acting on the group.

When copying to a removable drive or network location, wait for the operation to finish before disconnecting the drive or closing the destination. Large image files and slow storage can take time. If a copy or move reports an error, note the filename and destination, then retry that file separately; the problem may concern one file or the destination rather than the whole selection. Keep the original files until you confirm the destination has the copies you need.
Or skip the browser setup
If you need screenshots of webpages rather than selecting image files already on your PC, ScreenshotNeo is a website screenshot API and MCP server from Yorker Media. A single GET request can return a PNG, JPEG, WebP, or PDF. It can also capture full pages, target an element, set a viewport or device preset, and apply options such as custom CSS, wait conditions, and cookies. See the ScreenshotNeo API documentation for parameters and setup.
Here is a runnable cURL example that saves a WebP screenshot of a webpage:
curl -G "https://api.screenshotneo.com/v1/shot" -d access_key=YOUR_API_KEY --data-urlencode url=https://stripe.com -o shot.webpThe same request in Python using the requests package:
import requests

r = requests.get(
    "https://api.screenshotneo.com/v1/shot",
    params={"access_key": "YOUR_API_KEY", "url": "https://stripe.com"},
    timeout=90,
)
r.raise_for_status()
with open("shot.webp", "wb") as image_file:
    image_file.write(r.content)
And in Node.js with its built-in fetch API:
const q = new URLSearchParams({ access_key: 'YOUR_API_KEY', url: 'https://stripe.com' });
const res = await fetch(`https://api.screenshotneo.com/v1/shot?${q}`);
if (!res.ok) throw new Error(`Screenshot request failed: ${res.status}`);
const image = await res.arrayBuffer();
await import('node:fs/promises').then(fs => fs.writeFile('shot.webp', Buffer.from(image)));
ScreenshotNeo accepts cookie or consent banners before capture and removes more than 60 known consent platforms, newsletter popups, and chat widgets; those steps can be turned off. Bot checks, blank pages, timeouts, failed loads, and cache hits cost nothing, and response headers report the page verdict and billing status. Its MCP server offers take_screenshot, get_page_info, and capture_pdf tools for Claude, Cursor, and other MCP clients. The Free plan includes 1,000 shots a month with no card; paid plans start at $5 for 3,000 shots. Sign up for the free plan and get 1,000 screenshots a month with no card.
Frequently asked questions
How do I select every screenshot in a folder?
Open the folder, click in its file list, and press Ctrl + A. This selects every item in the current list, so check that the folder contains only items you intend to act on.
Can I select screenshots from more than one folder at once?
File Explorer selects items in the folder or file-picker view you are working in. You can move or copy files into a common folder first, then select them together there.
Does Windows + Shift + S select multiple screenshots?
No. It opens the screen-capture workflow. Use File Explorer to select screenshot files that already exist.
Can I undo an accidental selection?
Yes. Selection alone does not change the files. Click an empty area to clear the selection, or use Ctrl-click to toggle a selected item off. If you already moved or deleted files, use the relevant undo command promptly or restore them from the destination or Recycle Bin where available.
Do the steps differ between Windows 10 and Windows 11?
The Shift-click, Ctrl-click, and keyboard selection ideas apply to both. The File Explorer layout and exact menu placement for options may vary by version. Microsoft ended Windows 10 support on October 14, 2025; that support-status change does not alter the basic file-selection gestures.


