How to Upload an Image to a Website
Learn how browser file uploads work, build a secure HTML upload endpoint, use WordPress, and troubleshoot image storage and delivery.

Direct answer: add a file input to a form, submit it with method="post" and enctype="multipart/form-data", then process the file on a server or through a CMS. Choosing a file in the browser does not publish it by itself. Your server must validate the binary data, store it safely, and return a URL or identifier that your page can use.
This guide covers the complete workflow: a plain HTML form, a JavaScript preview, a server endpoint, WordPress, drag-and-drop, validation, access control, storage choices, troubleshooting, and a managed alternative when you need screenshots of uploaded pages.
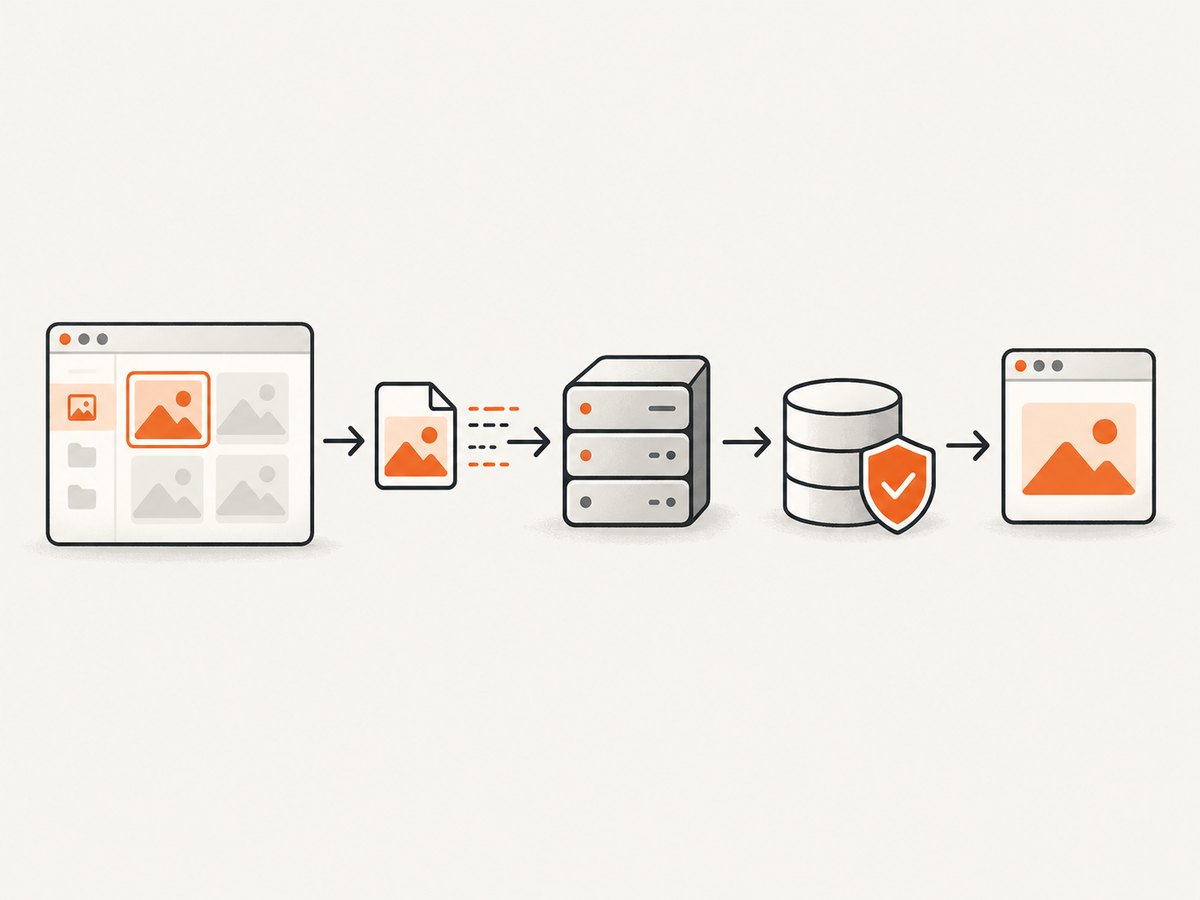
1. The upload flow in four steps
- Select: the browser opens the operating system file picker for
<input type="file">. - Submit: the browser sends the selected binary file in a
POSTrequest encoded asmultipart/form-data. - Validate and store: your server checks the content, size, dimensions, and permissions, then writes it to storage.
- Publish: the server returns a safe URL or ID. Your HTML can then reference that URL with
<img src="...">.
MDN explains that selected files can be uploaded by form submission or manipulated with JavaScript and the File API. The file picker is only the first step; permanent storage requires a server or storage service. See MDN’s file input documentation.
2. Minimal HTML upload form
Start with this complete form. The name value, image, is the field name your server must read.
<form action="/upload" method="post" enctype="multipart/form-data">
  <label for="image">Choose an image</label>
  <input
    id="image"
    name="image"
    type="file"
    accept="image/png,image/jpeg"
    required
  >
  <button type="submit">Upload</button>
</form>
multipart/form-data is required for binary file fields. Without it, the request may contain the form fields but no usable file. MDN’s form submission guidance documents the POST and encoding requirements.
What the attributes do
| Attribute | Purpose |
|---|---|
action |
Server URL that receives the upload. |
method="post" |
Sends the file in the request body. |
enctype="multipart/form-data" |
Encodes binary file data correctly. |
name="image" |
Key used by server-side upload code. |
accept |
Guides the picker toward image formats; it is not security validation. |
required |
Prevents an empty submission in supporting browsers. |
3. Add a client-side preview with JavaScript
A preview improves feedback and lets you show dimensions and file size before sending. It does not replace server validation.
<form id="upload-form" action="/upload" method="post" enctype="multipart/form-data">
  <label for="image">Choose an image</label>
  <input id="image" name="image" type="file" accept="image/png,image/jpeg" required>
  <span id="details"></span>
  <img id="preview" alt="Selected image preview" hidden width="320">
  <button type="submit">Upload</button>
</form>

<script>
const input = document.querySelector('#image');
const preview = document.querySelector('#preview');
const details = document.querySelector('#details');

input.addEventListener('change', () => {
  const file = input.files[0];
  if (!file) return;

  const maxBytes = 5 * 1024 * 1024;
  if (file.size > maxBytes) {
    input.value = '';
    preview.hidden = true;
    details.textContent = 'Choose an image smaller than 5 MB.';
    return;
  }

  preview.src = URL.createObjectURL(file);
  preview.hidden = false;
  details.textContent = `${file.type || 'unknown type'} · ${(file.size / 1024).toFixed(1)} KB`;
});
</script>
The File API exposes selected files through HTMLInputElement.files. Revoke object URLs after use in long-lived interfaces to avoid retaining browser memory. A preview can inspect a file, but only the server decides whether it is accepted.
4. Build the server endpoint
Your /upload endpoint should authenticate the user when necessary, enforce request and image-size limits, inspect the actual file bytes, generate a server-side name, store the file outside executable paths where appropriate, and return a usable URL.
Example: Node.js and Express
import express from 'express';
import multer from 'multer';
import crypto from 'node:crypto';
import path from 'node:path';
import fs from 'node:fs/promises';

const app = express();
const uploadDir = path.resolve('uploads');
await fs.mkdir(uploadDir, { recursive: true });

const upload = multer({
  dest: uploadDir,
  limits: { fileSize: 5 * 1024 * 1024, files: 1 },
  fileFilter: (_req, file, cb) => {
    cb(null, ['image/jpeg', 'image/png'].includes(file.mimetype));
  }
});

app.post('/upload', upload.single('image'), async (req, res) => {
  if (!req.file) return res.status(400).json({ error: 'Image is required' });

  // In production, decode the file and verify its signature and dimensions
  // with an image library before making it public.
  const safeName = `${crypto.randomUUID()}${path.extname(req.file.originalname).toLowerCase()}`;
  const finalPath = path.join(uploadDir, safeName);
  await fs.rename(req.file.path, finalPath);

  res.status(201).json({ url: `/uploads/${safeName}` });
});

app.use('/uploads', express.static(uploadDir, { fallthrough: false }));
app.listen(3000);
This example demonstrates the request shape, size limit, and generated name. Add authentication, malware scanning where required, content decoding, image resizing, and a storage policy appropriate for your application before exposing uploads publicly.
Server validation checklist
- Check the authenticated user and authorization for the destination.
- Limit request body size and individual file size.
- Allow only formats your application needs.
- Inspect the detected MIME type and file signature (magic bytes), not only the filename or client header.
- Decode the image with an image library and reject malformed files.
- Enforce pixel dimensions and optionally megapixel limits to prevent decompression bombs.
- Generate a new random filename; never use a supplied path directly.
- Store uploads where they cannot execute as server-side code.
- Set read permissions deliberately and return a URL only when the caller should see it.
- Keep backups and define retention and deletion behavior.
The accept attribute is a usability hint. MDN explicitly states that it does not validate selected types. OWASP’s file-upload guidance likewise warns against trusting client extensions and headers; validate the content on the server.
5. Upload with JavaScript fetch
For a single-page interface, construct FormData and send it to the same endpoint. Do not manually set the multipart content type; the browser supplies the boundary.
const input = document.querySelector('#image');
const form = new FormData();
form.append('image', input.files[0]);

const response = await fetch('/upload', {
  method: 'POST',
  body: form,
  credentials: 'include'
});

if (!response.ok) throw new Error(`Upload failed: ${response.status}`);
const result = await response.json();
console.log('Published URL:', result.url);
For large files, show progress with an XMLHttpRequest or a resumable-upload protocol. For drag-and-drop, handle dragover and drop, read event.dataTransfer.files, and pass the resulting File to the same FormData code. The server-side checks remain identical.
6. Choose where uploaded images live
| Option | Best for | Trade-offs |
|---|---|---|
| CMS media library | Blogs and marketing sites | Fast setup and built-in URLs; less control over processing and storage. |
| Your application server | Small apps or private files | Full control; you own disk capacity, backups, scaling, and security. |
| Object storage or managed media service | High volume and global delivery | Scalable delivery and transformations; adds vendor dependency and configuration. |
Decide who owns storage, maximum file size, supported formats, URL lifetime, access control, transformations, backup policy, and deletion behavior. Public images can use stable URLs; private images should use authorization checks or short-lived signed URLs.
7. Upload an image in WordPress
- Sign in with a role allowed to upload media.
- Open Media → Add New, or open Media → Library and choose Add New.
- Select a file or drag it into the upload area.
- Wait for processing to finish.
- Open the media item to copy its URL, add alt text, or insert it into a post or page.
WordPress stores media in its uploads directory and may create generated sizes. If the upload reports a permissions problem, ask the site administrator to inspect the installation’s wp-content permissions and disk availability. WordPress documents both Media Add New and Media Library workflows in its Media Add New documentation.
8. Or skip the browser setup
If your goal is to capture a page after an image has been uploaded, ScreenshotNeo can return a screenshot or PDF from one GET request. Its capture flow accepts cookie and consent banners as a visitor and removes more than 60 known consent platforms, newsletter popups, and chat widgets before the shot. Bot checks, blank pages, timeouts, failed loads, and cache hits are not billed; the response identifies the result with X-Page-Verdict and X-Billed headers.

See the ScreenshotNeo API documentation for all options, including full-page capture, element selectors, device presets, custom CSS and JavaScript, waits, headers, cookies, blocking rules, caching, signed links, asynchronous jobs, bulk capture, and PDFs.
curl -G "https://api.screenshotneo.com/v1/shot" -d access_key=YOUR_API_KEY --data-urlencode url=https://example.com/uploads/photo.jpg -o shot.webpimport requests
r = requests.get(
"https://api.screenshotneo.com/v1/shot",
params={"access_key": "YOUR_API_KEY", "url": "https://example.com/uploads/photo.jpg"},
timeout=90,
)
r.raise_for_status()
open("shot.webp", "wb").write(r.content)const q = new URLSearchParams({
access_key: 'YOUR_API_KEY',
url: 'https://example.com/uploads/photo.jpg'
});
const res = await fetch(`https://api.screenshotneo.com/v1/shot?${q}`);
if (!res.ok) throw new Error(`Screenshot failed: ${res.status}`);
const bytes = Buffer.from(await res.arrayBuffer());
await fs.promises.writeFile('shot.webp', bytes);ScreenshotNeo also provides an MCP server with take_screenshot, get_page_info, and capture_pdf tools for Claude, Cursor, and other MCP clients. The Free plan includes 1,000 shots per month without a card; paid plans start at $5 for 3,000 shots. Create a free ScreenshotNeo account.
9. Troubleshooting uploads
| Symptom | Likely cause | Fix |
|---|---|---|
| Picker works, server sees no file | Wrong method, missing multipart encoding, or mismatched field name | Use POST, enctype="multipart/form-data", and match name="image" to server code. |
| 413 or request-size error | Reverse proxy or application limit is too small | Raise limits consistently or reduce the image before upload. |
| Type rejected | Unsupported format or server detects a different MIME type | Convert to an allowed format and validate decoded content. |
| Upload succeeds but image is blank | Bad URL, private permissions, or failed transformation | Open the returned URL directly, inspect status codes, and check generated files. |
| WordPress permission error | Uploads directory is not writable | Have an administrator check wp-content permissions and disk space. |
| Large images cause timeouts | Slow upload, decoding, or thumbnail generation | Set practical pixel limits, resize client-side, and process asynchronously. |
| Users can execute uploaded files | Uploads stored in an executable path | Use non-executable storage, strict content checks, and server rules that disable script execution. |
10. Performance, reliability, and cost
- Performance: resize oversized photos before upload, use modern formats where your audience supports them, create only the derivatives you need, and serve through a CDN or object-storage delivery layer when traffic grows.
- Reliability: use unique names, atomic writes, retries for transient storage errors, checksums where appropriate, monitoring, and backups. Return a durable ID only after storage succeeds.
- Security: require authentication for private media, use HTTPS, apply CSRF protection to cookie-authenticated forms, and log upload decisions without logging sensitive file contents.
- Cost: account for storage, transformed copies, bandwidth, backups, scanning, and request volume. Deleting unused derivatives and defining retention rules prevents unbounded growth.
- Screenshot capture: wait for an uploaded image to become publicly readable before requesting a screenshot. Use a selector wait or network-idle wait when the page renders images asynchronously. Cache captures when the page has not changed.
11. Practical checklist
- File picker has a clear label and an appropriate
accepthint. - Form uses POST and multipart encoding.
- Server authenticates and authorizes the upload.
- Request, file-size, dimension, and pixel limits are enforced.
- Content is decoded and checked independently of the filename.
- Names are generated server-side.
- Storage and URLs have explicit public/private rules.
- Errors are safe for users and useful in server logs.
- Backups, deletion, and retention are documented.
- Uploaded pages are tested on the target devices and browsers.
12. FAQ
Can HTML alone upload an image?
No. HTML can collect and submit the file, but a server, CMS, or storage API must receive and retain it.
Is accept="image/*" secure?
No. It guides the picker. Validate the file’s bytes, decoded content, dimensions, and size on the server.
Why use POST instead of GET?
POST carries the multipart file body and avoids placing binary data in a URL.
Should I trust the original filename?
No. Keep it only as display metadata if needed and generate a new storage name.
When should uploads be asynchronous?
Use a background job when scanning, resizing, transcoding, or remote storage can exceed a normal request timeout.
Can I show a preview before uploading?
Yes. Use the File API and an object URL, while remembering that the server remains the authority.


