BlogScreenshots on your device
How to Take a Screenshot of a Page on Windows
Learn every Windows screenshot shortcut, capture menus and windows, find saved files, edit images, and automate webpage captures with ScreenshotNeo.

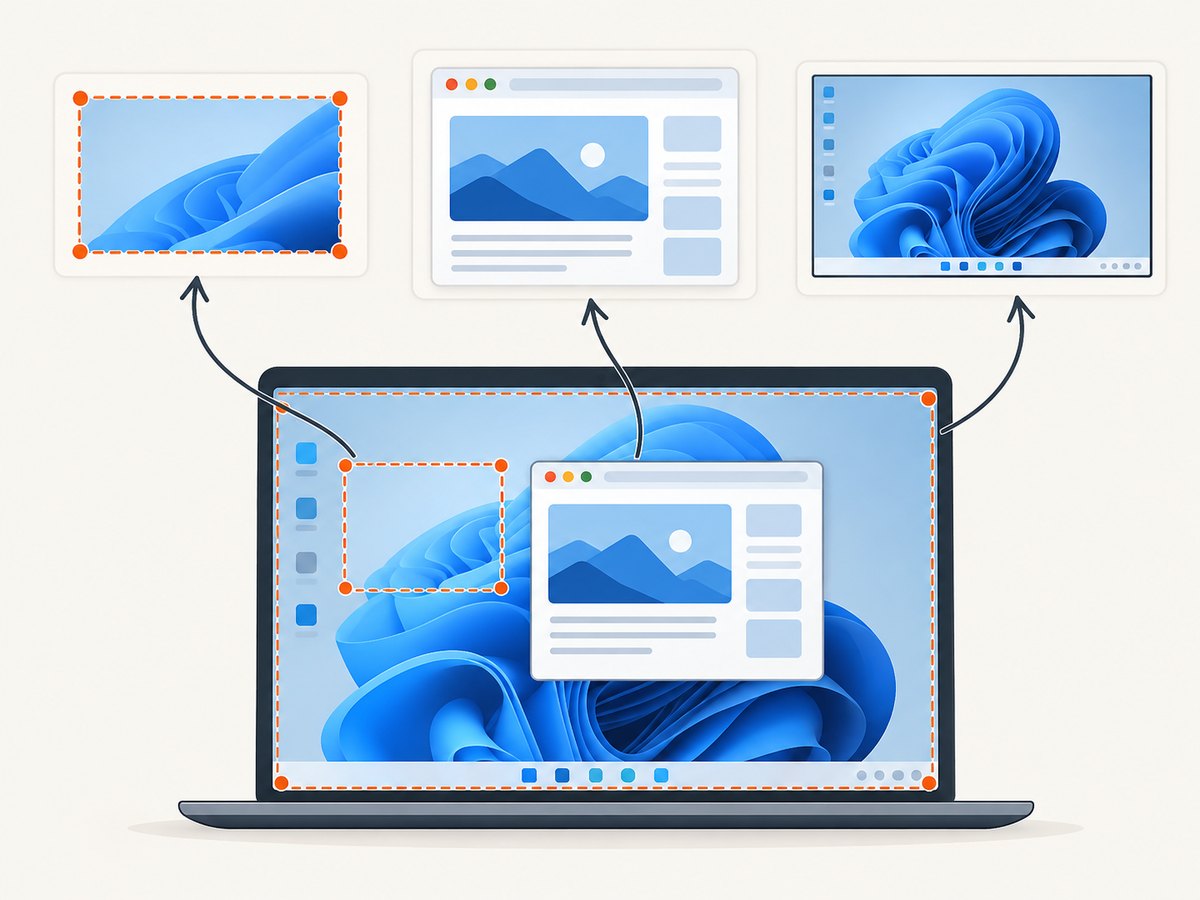
Windows gives you several ways to screenshot a page: press Windows logo key + Shift + S to select a region, use Snipping Tool’s Window mode for one app, choose Full screen for the whole display, or press Print Screen (PrtSc) for a clipboard copy. Snipping Tool can then mark up, crop, extract text from, save, and share the capture. For a webpage that must be captured beyond the visible screen, or for repeatable server-side captures, use an API such as ScreenshotNeo.
1. Choose the right Windows capture method
| Goal | Best method | Result |
|---|---|---|
| Capture a rectangle or irregular area | Windows + Shift + S | Image copied to the clipboard and opened in Snipping Tool |
| Capture one application window | Snipping Tool, Window mode | Only the selected window |
| Capture everything visible on a display | Snipping Tool, Full screen, or Print Screen | Full-screen image |
| Capture a menu or tooltip | Snipping Tool with a 1–5 second delay | Timed image capture |
| Record a short screen video | Windows + Shift + R | MP4 recording saved by Windows |
Microsoft documents these Snipping Tool modes for Windows 10 and Windows 11. A captured snip opens in Snipping Tool, where you can edit it before saving or sharing. See Microsoft’s Snipping Tool instructions for the current interface.
2. Capture a selected part of a page
- Open the page and scroll until the content you need is visible.
- Press Windows + Shift + S.
- Choose Rectangular snip, Window snip, Full-screen snip, or Freeform snip from the overlay.
- For a rectangle, drag from one corner to the other. For Freeform, draw around the object.
- Release the mouse. Windows copies the result to the clipboard and shows a notification.
- Select the notification to open the image in Snipping Tool, then annotate, crop, extract text, save, or share it.
This is usually the fastest way to capture a chart, paragraph, dialog, or part of a browser page. It captures what is visible on the display at that moment; it does not automatically scroll through the rest of a long webpage.
Keyboard details
The shortcut works without a dedicated Print Screen key, which helps on compact laptops. On some keyboards, Print Screen is combined with another key and requires Fn. Windows also lets you configure the Print Screen key in Settings > Accessibility > Keyboard so it opens screen snipping.
3. Capture one browser window
- Open Snipping Tool from the Start menu.
- Choose Window as the snip type.
- Select New.
- Click the browser window you want to capture.
- Review the result in Snipping Tool and save it.
Window mode is useful when you want the complete browser window, including its visible page area, without manually dragging a rectangle. Other windows are excluded from the image. If the browser is maximized, the capture still represents the visible window rather than content below the fold.
4. Capture the entire screen
Use Snipping Tool’s Full screen option to capture every display area visible to Windows. Alternatively, press Print Screen; Microsoft describes this as a static image of the entire screen placed on the clipboard.
- Arrange the desktop exactly as you want it captured.
- Open Snipping Tool and select Full screen, or press Print Screen.
- If you used Print Screen, open Paint, Photos, or another image editor and press Ctrl + V.
- Save the image in the format and folder you need.
Full-screen capture can include taskbars, notifications, multiple windows, and sensitive information. Close unrelated windows and dismiss notifications before capturing.
5. Capture a menu, tooltip, or disappearing control
A normal shortcut can be difficult when opening a menu changes the screen. Snipping Tool’s delay gives you time to open it.
- Open Snipping Tool.
- Choose Rectangular, Window, Full-screen, or Freeform mode.
- Set Delay to 1, 2, 3, 4, or 5 seconds.
- Select New.
- During the countdown, open the menu, context menu, tooltip, or hover state.
- When the screen dims, select the required area.
Use the shortest delay that gives you enough time. For a right-click menu, prepare the pointer first, start the snip, then right-click when the countdown begins.
6. Edit, extract text, save, and share
After a capture opens, Snipping Tool provides pen and highlighter marks, shapes, an eraser, crop, undo, redo, text extraction, saving, and sharing. Use crop to remove browser chrome or unrelated desktop content. Use text extraction when you need to copy a URL, error message, or visible code from an image.
Microsoft says captured snips are automatically saved to the Screenshots folder. The automatic-save behavior and folder can be changed in Snipping Tool Settings. Save as creates another copy with a filename and location you choose, so use it when a project requires a predictable path.
Which image format should you use?
- PNG: best for text, diagrams, screenshots, and lossless editing.
- JPEG: smaller files for photographs or quick sharing, with some compression.
- WebP: compact web delivery when the destination supports it.
7. Record a short area as video
For motion that a still image cannot explain, press Windows + Shift + R. Select a rectangular region, choose Start, reproduce the interaction, and choose Stop. Microsoft’s shortcut reference says recordings are automatically saved as MP4 files in Videos\Screen Recordings by default. This is useful for a hover menu, animation, or multi-step bug report.
8. What Windows screenshots do not capture automatically
Snipping Tool captures the visible screen, a selected window, or a selected region. It does not, according to the cited Microsoft documentation, provide a browser-specific scrolling screenshot that automatically stitches content below the viewport. If you need a complete long page, you must either capture it in sections, use a browser feature or extension suited to your browser, or render it with a capture service.
Visible-page captures can also be affected by consent dialogs, newsletter popups, chat bubbles, lazy-loaded images, responsive breakpoints, and login state. Record the browser size, zoom level, and page state when reproducibility matters.
9. Troubleshooting Windows screenshots
| Problem | Likely cause | Fix |
|---|---|---|
| Windows + Shift + S does nothing | Shortcut intercepted, Snipping Tool unavailable, or keyboard issue | Open Snipping Tool from Start, update Windows, and try an external keyboard. Print Screen may require Fn. |
| Only a black or blank area appears | Protected content, a hardware-accelerated surface, or a page that has not finished rendering | Wait for the page, disable a problematic overlay if you control it, or capture a different visible region. Some protected surfaces cannot be copied. |
| The menu disappeared | Capture started after the menu was opened | Use Snipping Tool Delay, then open the menu during the countdown. |
| The screenshot includes private information | Full-screen mode captured notifications or other windows | Use a rectangular or window snip, close unrelated apps, and crop before sharing. |
| The image was copied but not saved | Print Screen and region snips use the clipboard first | Open the notification in Snipping Tool or paste into an editor and use Save as. |
| Text is unreadable | Low display scaling, zoom, or JPEG compression | Capture at native resolution, increase browser zoom, use PNG, or capture a smaller region. |
| A long page is cut off | Only the visible viewport was captured | Capture sections manually or use a full-page rendering workflow. |
10. Or skip the browser setup
If you need repeatable webpage images, full-page output, a chosen viewport, or server-side automation, ScreenshotNeo provides one GET request. The API returns PNG, JPEG, WebP, or PDF. The parameter names used by other screenshot APIs also work, which can simplify migration. See the ScreenshotNeo API documentation for the complete option list.

cURL
curl -G "https://api.screenshotneo.com/v1/shot" -d access_key=YOUR_API_KEY --data-urlencode url=https://stripe.com -o shot.webpPython
import requests
r = requests.get("https://api.screenshotneo.com/v1/shot", params={"access_key": "YOUR_API_KEY", "url": "https://stripe.com"}, timeout=90)
open("shot.webp", "wb").write(r.content)
Node.js
const q = new URLSearchParams({ access_key: 'YOUR_API_KEY', url: 'https://stripe.com' });
const res = await fetch(`https://api.screenshotneo.com/v1/shot?${q}`);
ScreenshotNeo can capture a full page with lazy images loaded, a single element by CSS selector, dark mode, any viewport or one of 12 device presets, retina scale, PDFs with paper size, margins, landscape, and page ranges, HTML/CSS, custom CSS and JavaScript, clicks before capture, hidden selectors, waits for a selector, delay, or network idle, and transparent backgrounds. You can also set headers, cookies, user agents, Authorization, timezone, geolocation, image resizing, cache TTL, signed links, asynchronous jobs with signed webhooks, bulk capture for 100 URLs per call, usage reporting, and an OpenAPI specification.
Clean shots remove consent banners, newsletter popups, and chat widgets before capture; more than 60 known consent platforms are supported, and each cleanup step can be turned off. Bot checks or CAPTCHAs, blank pages, timeouts, failed loads, and cache hits cost nothing. Responses identify the result with X-Page-Verdict and X-Billed headers. An MCP server provides take_screenshot, get_page_info, and capture_pdf tools for Claude, Cursor, and other MCP clients.
The Free plan includes 1,000 shots per month with no card. Paid plans start at $5 for 3,000 shots; Growth is $15 for 15,000, Pro is $39 for 60,000, Scale is $99 for 250,000, and Business is $249 for 1,000,000. Yearly billing gives two months free, and every feature is available on every plan. Create a free ScreenshotNeo account and start with 1,000 screenshots a month without adding a card.
11. Reliability, performance, and cost considerations
Windows desktop capture
- It is immediate and has no API usage cost.
- Results depend on your display resolution, zoom, window arrangement, notifications, and page load state.
- Manual captures do not provide a consistent viewport or an auditable result for a build pipeline.
- Long pages require multiple captures or another workflow.
Automated capture
- Set a fixed viewport, device scale, timezone, and geolocation when visual comparisons must be stable.
- Wait for a selector or network idle when content is asynchronous; use a short delay only when a deterministic event is unavailable.
- Use caching with a TTL for repeated identical URLs, and bulk capture for batches.
- Inspect
X-Page-VerdictandX-Billedso failed or unbillable responses are handled separately from clean images. - Keep access keys on the server, set client timeouts, and retry transient network failures with backoff. Do not blindly retry a page that consistently returns a bot check or blank verdict.
12. Practical checklist
- Decide whether you need a visible screen, one window, a region, or the entire webpage.
- For a quick visible capture, press Windows + Shift + S.
- For a disappearing menu, set a 1–5 second delay.
- Check the image for private data, notifications, and consent dialogs.
- Use PNG for text and diagrams.
- Save a named copy when another person or process needs to find it.
- Use an automated renderer when you need full-page, repeatable, or scheduled captures.
13. FAQ
Where does my Windows screenshot save?
Snipping Tool can automatically save captures to the Screenshots folder, and its Settings control that behavior and location. A Print Screen capture may only be on the clipboard until you paste and save it.
Can I screenshot only one browser tab?
Window mode captures the browser window. For one tab’s visible content, activate that tab and use a rectangular snip, or crop the window capture.
How do I screenshot without a Print Screen key?
Use Windows + Shift + S. It works on laptops that hide Print Screen behind an Fn layer or do not include the key.
Can Snipping Tool capture a whole scrolling webpage?
The Microsoft documentation cited here covers visible screen, window, region, full-screen, delayed, and video capture. It does not document automatic browser scrolling capture. Use a full-page browser workflow or ScreenshotNeo when the page extends below the viewport.
Can I automate Windows screenshots from a script?
You can automate desktop applications with separate Windows automation tools, but that still depends on an interactive display. For a server-side request, use ScreenshotNeo’s API or MCP server so the capture does not depend on a logged-in desktop.